October 31, 2012

Autumn Kindness (Tutorial)

Another autumn design to share today combining Penny Black’s Foliage Fancy with Imagine Crafts/Tsukineko inks.


Here is how this card came to life...

Create a 3 3/8 x 5-inch card base from Sticks & Stones cardstock and accent the edges by running a Delicata Golden Glitz ink pad along the sides.  Set aside.

Cut a 2 7/8 x 4 ¼-inch piece of Storm cardstock and dry emboss a border around the outside edge.  Stamp the sentiment toward the bottom (leaving room for the leaf) in Onyx Black VersaFine and heat emboss with clear powder.

Add three brads below the sentiment and edge the sides of the cardstock with Delicata Golden Glitz. 

Mat with a 3 x 4 3/8-inch piece of Grand Canyon cardstock and adhere to the front of the prepared card with dimensional foam.

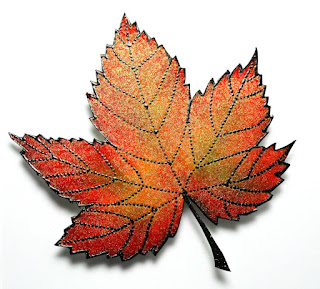
On a separate piece of Storm cardstock, stamp the leaf with Onyx Black VersaFine and heat emboss with Clear Embossing Powder.


Using Brushstixs, pull color from the individual segments of the Kaleidacolor Ink Pad and color the image.

Continue coloring, using a separate Brushstix for each color, until the desired shading has been achieved.

Trim the leaf and place on a protected surface.  Thoroughly shake to mix Copper Psst Sheer Shimmer Spritz.  Apply a few drops to an InkBlusher and lightly pounce onto the leaf.


Attach the leaf to the front of the prepared card above the sentiment with dimensional foam.

Design Variation:  Change the sentiment to a birthday greeting for a masculine card.
 
Coming soon….Penny Black’s Foliage Fancy combined with Imagine Crafts/Tsukineko Sheet Metal!

Thank you for stopping by,
Elizabeth

Supplies:
Penny Black Stamps: Foliage Fancy (30-138)
Penny Black Mix & Match Cardstock: Storm (01-001), Sticks & Stones (02-002), Grand Canyon (03-002)
Imagine Crafts/Tsukineko: Onyx Black VersaFine, Autumn Leaves Kaleidacolor, Delicata Golden Glitz, Copper Psst Sheer Shimmer Spritz, Brushstix Brush Tip #2, InkBlushers, Clear Embossing Powder
Other: Antique Mini Brads by Making Memories, Adhesives: Dimensional Foam & Double-Sided Tape, Heat Tool, Scissors, Scoring Tool

October 29, 2012

Thanks A Bunch (Tutorial)

Today’s card is inspired by the colorful leaves of the autumn season.


Incorporating a little coloring with a VersaMarker and heat embossing with clear powder, colors can be protected when shading occurs and also add textural sheen.


Step-By-Step Instructions
(This INKd Imagine Crafts project can also be downloaded or printed “here”)

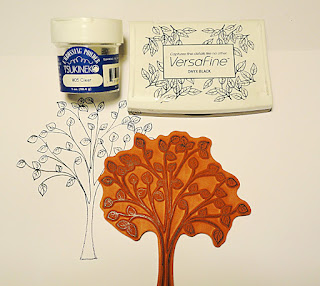
Stamp Autumn Tree on white cardstock in Onyx Black VersaFine. 
While the ink is wet, sprinkle the image with clear embossing powder. 
Tap off the excess powder and heat set.


Color the image with Memento Markers.


Color the image with a VersaMarker.
While wet, sprinkle with clear embossing powder,
 tap off the excess powder and heat set.


Mask off a small rectangle over the tree with Eclipse Tape (or sticky notes).
Apply Bahama Blue Memento ink with a sponge dauber to the exposed window.


Remove the Eclipse Tape and stamp the sentiment in Onyx Black VersaFine.


Trim the stamped image to measure 3 ¼ x 4 ¾.
Stamp a ¼ x 4 ¾ piece of Grand Canyon cardstock
with the grass from Sweet Home in Espresso Truffle Memento ink.
Attach the strip to the back of the stamped panel on the right side so 1/8 of an inch
of the design overhangs the edge and the total piece measures 3 3/8 x 4 ¾.
Attach the artwork to the front of a Les Petites card base.
Use one of the leaves trimmed from the side for an embellishing accent.
 

May brightly colored leaves dance across your path today,
Elizabeth

Supplies:
Penny Black Mix & Match Cardstock: Storm (01-001), Grand Canyon (03-002)
Imagine Crafts/Tsukineko: Onyx Black VersaFine, Bahama Blue Memento, Espresso Truffle Memento, Memento Dual Tip Markers (PM: 100, 103, 200, 301, 302, 703, 704, 706, 800, 802), VersaMarker, Clear Embossing Powder, Sponge Dauber
Other: Judi Kins Eclipse Tape, Adhesive, Dimensional Foam, Heat Tool, Scissors

October 25, 2012

Halloween Treats (Part 2 of 2)

The second installment of "Halloween Treats" is a candy matchbook. 

This was designed to hold a thick, yummy piece of chocolate!


You can view and/or print the Imagine Crafts/Tsukineko INKd project sheet “here” which in addition to step-by-step instructions lists all the frightful cute Penny Black stamps used.


There is also a printable INKd project sheet "here" for the Halloween Treat Bag featured in Monday’s post “here” which included a bonus how-to for the metal tag. 

Spooky wishes,
Elizabeth

October 22, 2012

Halloween Treats (Part 1 of 2)

This week I have two “Artist in Residence” (Imagine Crafts/Tsukineko) projects that are all about creating ghoulish wrappings for those yummy Halloween treats.

Today’s technique magically transforms tracing paper into a glassine-like bag!


Candy corn is secretly tucked into this festive 2 ¼ x 5-inch pouch decorated with the branches from Penny Black’s Hoot of a Time.

Project Tutorial

 Fold a 2 ¼ x 10-inch piece of tracing paper in half and glue the sides to form a 2 ¼ x 5-inch pouch. 
Using InkBlushers, randomly pounce Brilliance Pearlescent Orange and
Brilliance Pearlescent Lime inks on the front and back of the pouch.


Spray the piece with Pewter Psst Sheer Shimmer Spritz.
A heat tool can be used to speed the drying time.

Stamp the branches from “Hoot of a Time” in Brilliance Starlite Black ink.

Fill the pouch with goodies and secure the top with decorative ribbons.


Optional Embellishment Accent

Trace the outline of a metal dog tag on a Photo Element and trim.

Apply GooseBumps Clear Texture Spray to a metal dog tag with an InkBlusher
 and affix the trimmed Photo Element.


Remove the protective backing on the reverse side
and stamp a sentiment in Ivory Black Opaque StazOn.


Stayed tuned for Part 2 of Halloween Treats….especially if you like chocolate!

Have a boo-tiful day,
Elizabeth

Supplies:
Penny Black Stamps: Hoot of a Time 40-152
Imagine Crafts/Tsukineko:  Brilliance Pearlescent Orange (BR-031), Brilliance Pearlescent Lime (BR-042), Brilliance Starlite Black (BR-082), Ivory Black Opaque StazOn (SZ-000-182), Pewter Psst Sheer Spritz (IA-SWL-006), GooseBumps Clear Texture Spray (TS-000-001), InkBlushers (IB-PKG-001),
Sheet Metal Dog Tags (MP-600-005), Photo Elements Halloween Dog Tag 
Other:  Tracing Paper, Glue Pen, Decorative Ribbons
 

October 18, 2012

"Mixed Media Mash Up"

Fellow Penny Black Designer Jill Foster (Inspired By) and I have teamed up for a collaborative art challenge!  We both share a love of stamping as well as mixed media collage art so it was only natural for us to combine the two in a “Mixed Media Mash Up”. 

Before beginning, we decided to incorporate these five elements into our projects: 
  1. Focal point created with a rubber stamp.
  2. Media Base:  Wood Board (3/4" x 5 1/2" x 12")
  3. Text paper from a book.
  4. Texture with stamping  (We agreed to use at least these three sets:  Crystalline 30-018, Salutations 30-014, Pointille 3860J)
  5. Penny Black Cardstock or Madison Designer Paper

You’ll be surprised how differently each one turned out!

It was fun setting out on this inky adventure wondering how Jill was using the same five required elements.  This is my creative vision…..


The media base (wood board) was covered with text paper and Gesso. 


The flowers from Petal Party were used for the focal point, which were stamped on Penny Black Mix & Match Cardstock (Fuchsia Fantasy and Summer Sun) with additional stamping with circles from Crystalline and the flourish from Flowers Sweet.  Words from the sentiment Dance, Sing, Love were repeatedly joined together to create the flower stems.  Bursts of white and black were infused throughout with stars and dots from Crystalline.


The other portions of Dance, Sing, Love were saved for these phrase banners.  Textural stamping can be seen in several places with Retro Pattern, Pointille and diamonds from Salutations

Layers of acrylic paint, modeling paste dots and gold micro beads are other colorful ways of adding textural interest.


A bird silhouette with a book text wing adds a bright contrast of white against the colorful background.  Also, stampings of Round and Round are randomly tucked into the design.  Tip/Hint:  The bird in Flight of Thread was the perfect element to fit in this spot; however, the image faced to the right.  To create a “silhouette”, the image was stamped on white cardstock, fussy cut and then FLIPPED to face to the left.


Working on a thick media base such as this wood board allows color, imagery and design to “wrap around” on the sides.

Here is a sneak peek of what Jill created…


If you think this little birdie is cute, wait to you see Jill's whole reveal “here”.  It bursts with creativity and color!

Thank you for joining us in what I hope will be the first of many more Mixed Media Mash Ups!

Elizabeth
 
Supplies:
Penny Black Mix & Match Cardstock: Fuchsia Fantasy 13-002, Summer Sun 17-003
Imagine Crafts/Tsukineko: Onyx Black VersaFine, Clear Embossing Powder, Morocco Memento, Love Letter Memento, Teal Zeal Memento
Other: Mod Podge, Gesso, Modeling Paste, Acrylic Paints, Micro Gold Beads


October 16, 2012

"Joyful Noise" Holiday Tag

Thank you for joining me today for a holiday tag created with a combination of various coloring mediums and crafting techniques! 
  
I love the nostalgic feel that Gesso and acrylic paints give to this tiny tag.


Torn pieces of book text were randomly adhered to a small piece of cardboard (recycled from a cereal box) with Mod Podge.  Once the piece was dry, it was die cut with a Spellbinders Labels Eleven.


Gesso was randomly applied over the book text and snowflakes (Crystalline) were stamped with white acrylic paint.  Edging the tag with red acrylic paint defined the perimeter of the tag and added a touch of rustic distress.


Penny Black’s Joyful Noise (illustrated by Mo Manning) was stamped on a separate piece of white cardstock with Onyx Black VersaFine and heat embossed with clear powder.  After the image had been colored it was fussy cut and attached to the tag with dimensional foam.

Special scheduling note....
I have a special collaborative post with more mixed media later this week....I can't wait to share the artist I have been working with!!

Smiles,
Elizabeth

Supplies:
Copic Markers
Dimensional Foam
Spellbinders: Labels Eleven (S4-246)
Tsukineko: Onyx Black VersaFine, Clear Embossing Powder
Other: Recycled Cardboard Cereal Box, Acrylic Paint (White & Red), Gesso, Mod Podge

October 12, 2012

Flash Friday Tip

Welcome to another Flash Friday Tip!

I enjoy creating my own embellishments from pieces of plastic and cardboard.  Not only can each piece be personalized as to size and color to coordinate with a project, but it also incorporates my love of recycling. 


A quick way to simultaneously color BOTH sides of an embellishment that uses a medium that takes time to dry (i.e. acrylic paint) is to hang the piece from a knotted loop of fishing line.

This loop serves two purposes.  It enables you to easily turn the piece back and forth while painting and is a built in hanger for drying. 

Enjoy,
Elizabeth

October 10, 2012

Trick or Treat?

No tricks today….just treats from Penny Black's Count Hedgula!


A dimensional frame was constructed from a Reverse Wonky Rectangle die cut from white cardstock and then sponged with Memento inks.  Randomly stamping the frame with spider webs added a subtle pattern.  A second Reverse Wonky Rectangle was used for the base.

Softly colored portions of Haunted House (illustrated by Mo Manning) were used to create the neighborhood behind Count Hedgula.  Tip/Hint: This is a great way to alter a large focal point stamp as seen in this sample “here” for a background.   By varying the thicknesses of dimensional foam under the elements, Count Hedgula appears to be across the street from the spooky houses.  

To balance the design, a friendly bat with a Halloween banner was added to the top right corner.

Have a happy day,
Elizabeth

Supplies:
Copic Markers
Dimensional Foam
Spellbinders: Reverse Wonky Rectangles (S4-114)
Tsukineko: Onyx Black VersaFine, Dandelion Memento, Cantaloupe Memento, Tangelo Memento, Pear Tart Memento, Pistachio Memento, Grape Jelly Memento, Lilac Posies Memento, Teal Zeal Memento, London Fog Memento, Tuxedo Black Memento, Sponge Daubers, Clear Embossing Powder

October 8, 2012

Thank You!

Thank you to everyone around the world, near and far, for your visits and comments on my blog for World Card Making Day and all throughout the year!

This stamp from Penny Black’s Hedgie Friends set is perfect for a window card.  Elevating the front panel of the card with extra thick foam tabs allows plenty of room for layering elements within the circle.


A piece of Summer Sun cardstock was distressed with Morocco Memento ink then stamped with the background from Warm Wishes in the same color.  This was then attached to the mini card base.

The “thank you” sentiment is one of my favorites and is from Illumination.

With heartfelt appreciation,
Elizabeth

Supplies:
Penny Black Mix & Match Cardstock: Summer Sun 17-002
Copic Markers
Dimensional Foam
Imagine Crafts/Tsukineko: Onyx Black VersaFine, Morocco Memento, Clear Embossing Powder, Jumbo Sponge Dauber

October 6, 2012

World Card Making Day With Penny Black


Happy World Card Making Day

I am very excited to join Penny Black as they celebrate the occasion "here" ALL DAY LONG with prizes, giveaways and lots of card art!

Here is a little joy I created to share with the world….

Finished Size:  3-3/8 x 3-3/4


Card Details: 
  • A white Les Petites card base was trimmed shorter and a decorative edge from a Labels Twenty-Two die was incorporated.
  • The front of the card was covered with a matching piece of Rose Garden cardstock distressed with Love Letter Memento and stamped with Inspiring in Espresso Truffle Memento.
  • The next layer is elevated and is an embossed piece of Madison paper edged in Peanut Brittle Memento and Delicata Golden Glitz inks.
  • Another elevated layer contains the cute critters from Joy to the World stamped on white cardstock with Onyx Black VersaFine and heat embossed with clear powder.   The top half was fussy cut and additional stamped accents of the scarves, ear muffs and hat were added.  Tip/Hint: Silicone is a wonderful adhesive alternative.  Perfect for attaching accents and simultaneously adding a tiny bit of dimension.
  • The small banner with the sentiment from Peace on Earth is highlighted with Summer Sky Memento ink and is flanked by two red beads threaded on twine.
Enjoy all the festivities,
Elizabeth

Supplies:
Penny Black Designer Paper Pad: Madison (80-001)
Penny Black Mix & Match Cardstock: Rose Garden (14-003)
Copic Markers
Dimensional Foam: 3M Scotch, EK Success
Image Crafts/Tsukineko: Onyx Black VersaFine, Love Letter Memento, Espresso Truffle Memento, Summer Sky Memento, Peanut Brittle Memento, Delicata Golden Glitz, Jumbo Sponge Daubers, Clear Embossing Powder
Provo Craft: Cuttlebug Swiss Dots Embossing Folder
Spellbinders: Labels Twenty-Two (S4-346)
Other: Twine, Red Beads

October 5, 2012

Special Event News


Happy Friday!

Tomorrow, October 6, is World Card Making Day and I am
very excited to be participating in a special event! 

If you’re out blog browsing, please feel free
to stop by and take a peek!

Lots of stamping fun!


October 3, 2012

Spooky Wishes

A quick post to share some spooky wishes from my house to yours….


Believe it or not, this Haunted House by Penny Black (illustrated by Mo Manning) is paired with two of their Christmas designs.  Their stamp versatility is spook-tacular!
 
The first Christmas design is the dotty background called Crystal Pattern and the second is Warm Wishes which is the cross-hatch pattern.  For easy reference, all the inks and papers for this card have been listed below.

Coming soon, I’ll show how I used this house for a background design element.

Have a great day,
Elizabeth

Supplies:
Penny Black Mix & Match Cardstock: Storm 01-003, Fern Green 05-001, Periwinkle 11-001, Summer Sun 17-003
Copic Markers
Dimensional Foam
Imagine Crafts/Tsukineko: Onyx Black VersaFine, Dandelion Memento, Cantaloupe Memento, Tangelo Memento, Grape Jelly Memento, Lady Bug Memento, Bamboo Memento, Clear Embossing Powder, Jumbo Sponge Daubers
Spellbinders: Labels Eight (S5-019)