Showing posts with label Video. Show all posts

January 21, 2013

Altered Book Journal Cover (Mixed Media & Video)

I have two exciting things to share today.  The first is the completion of the cover of my altered book journal.

Altered Journal Cover

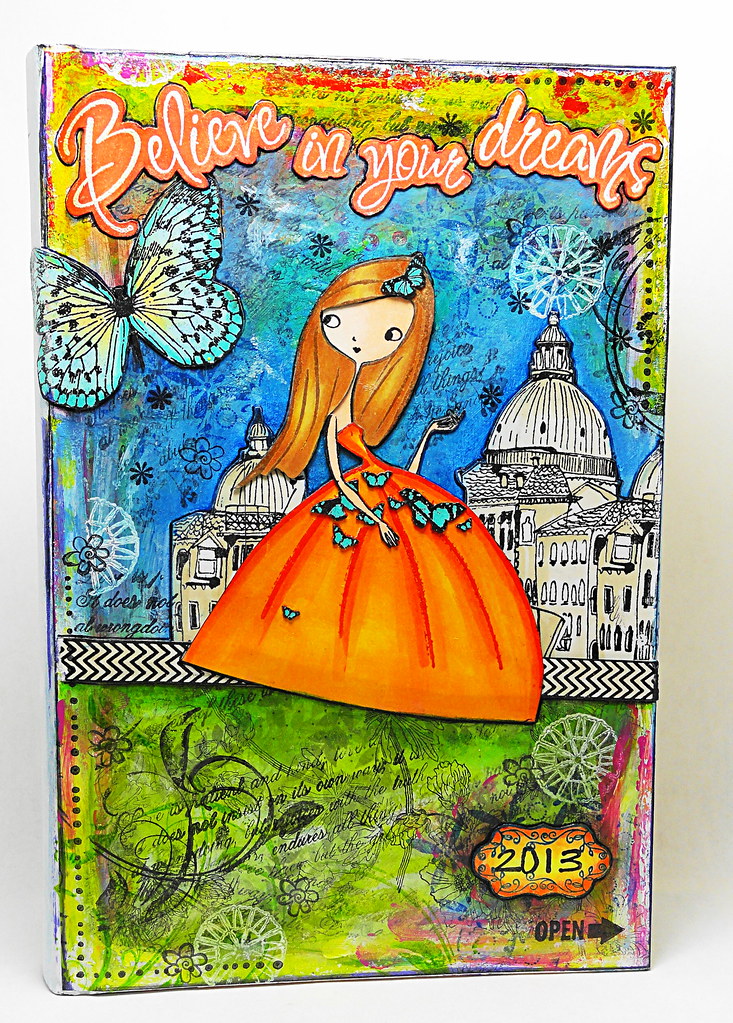
You can see the cover before the transformation “here”.

I have so many ideas floating through my mind and I can’t wait to start "renovations" inside the book.

This is a short video with my thoughts and musings of how I approached the project…..
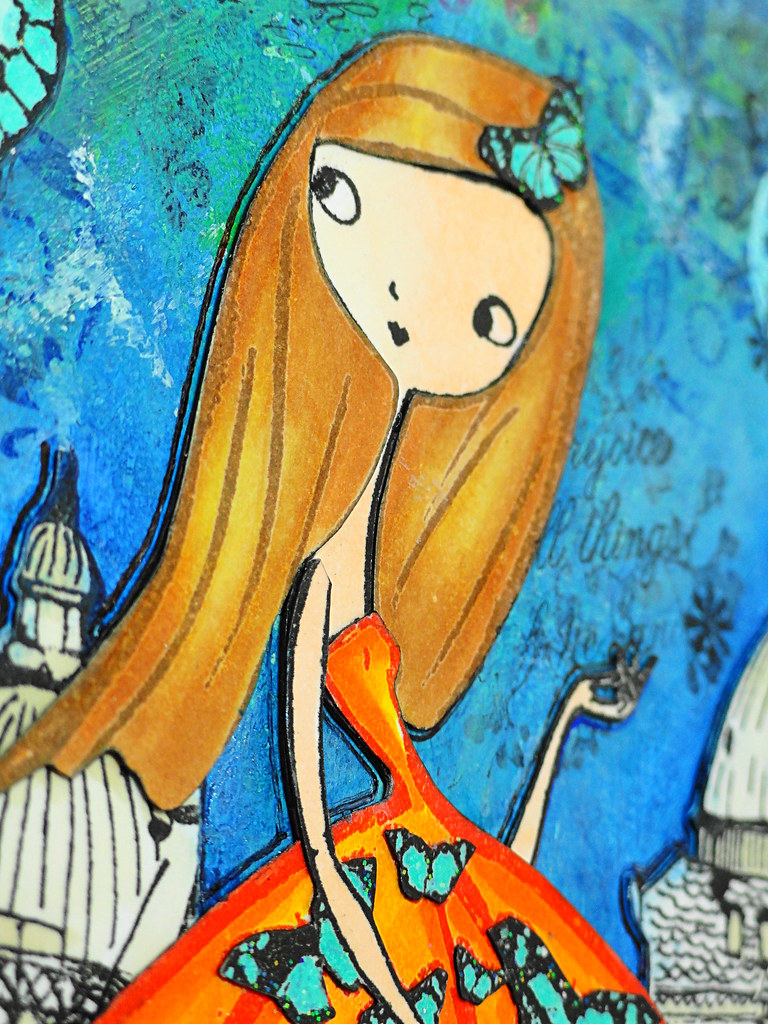
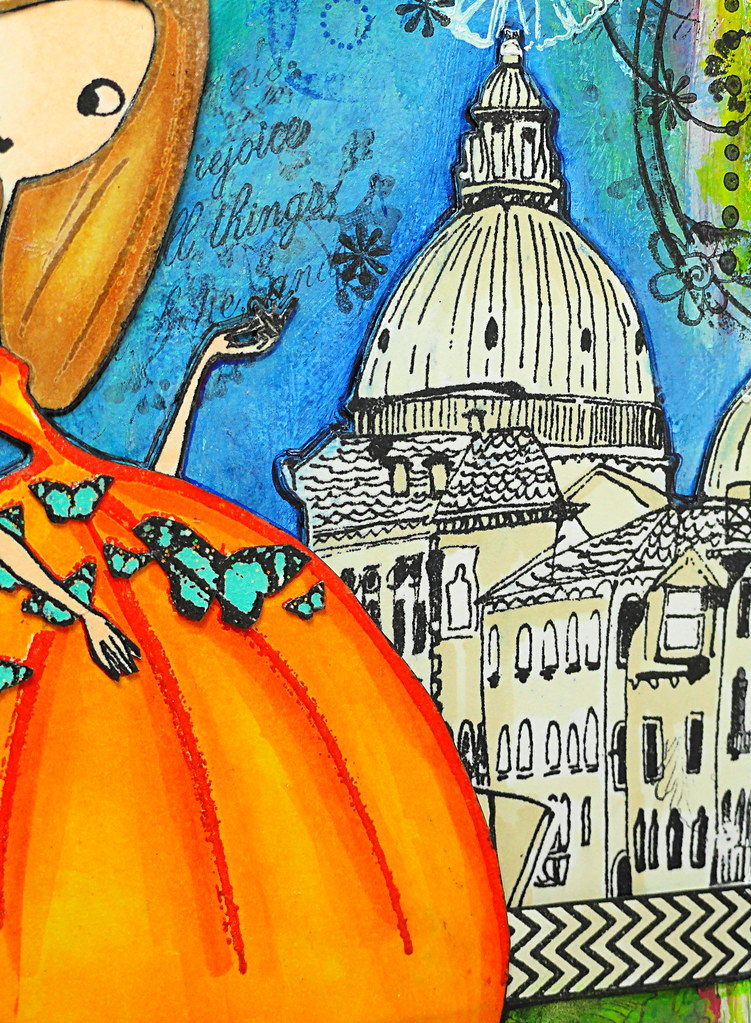
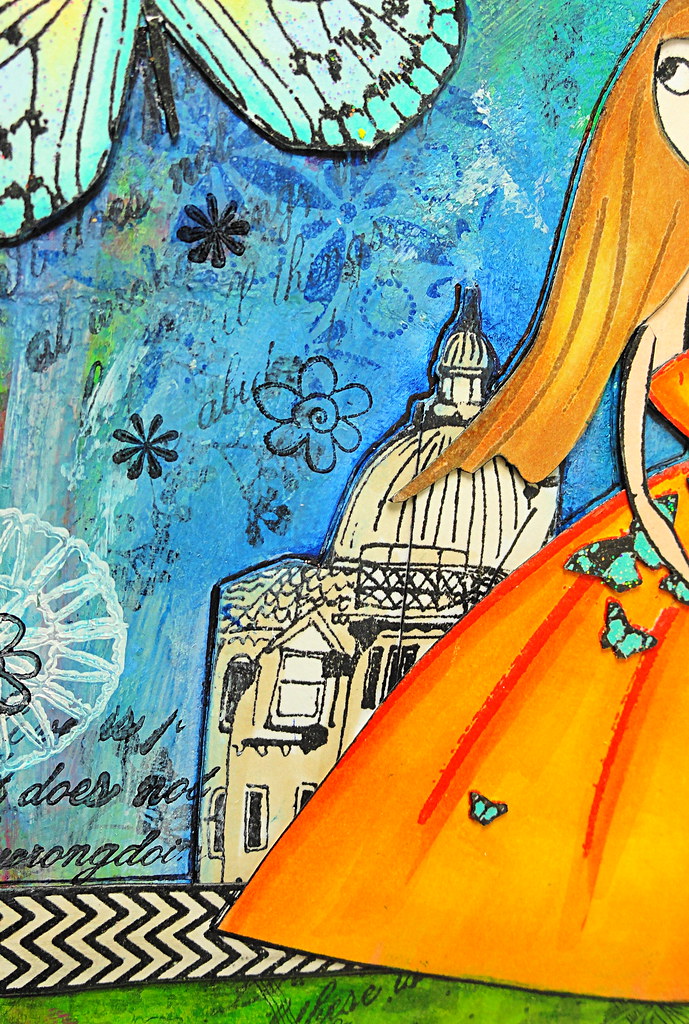
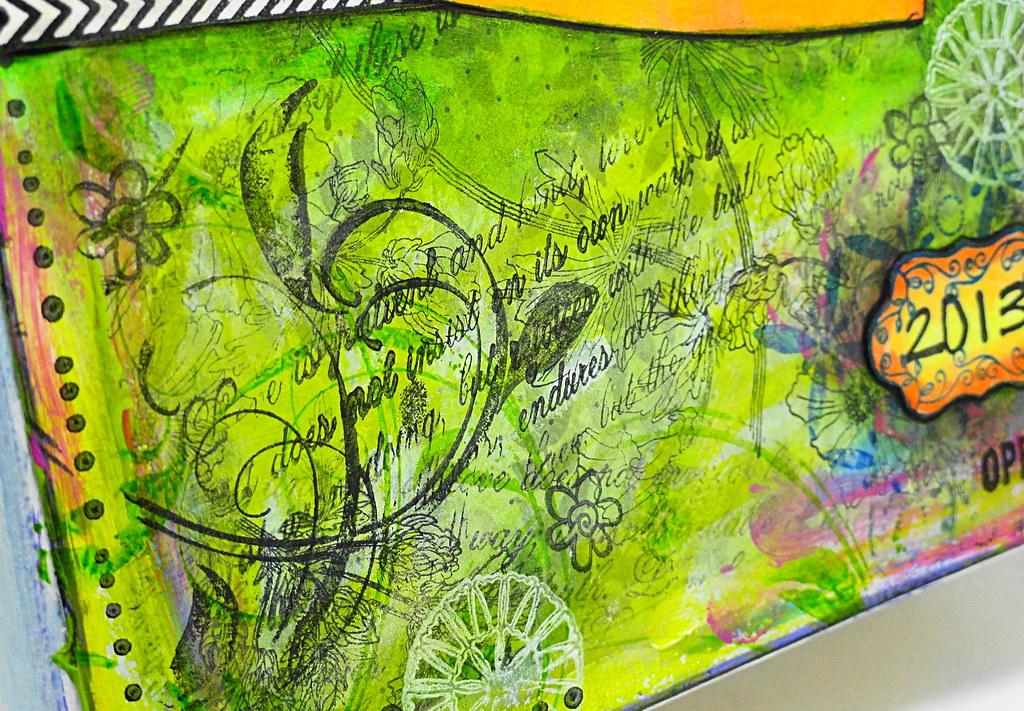
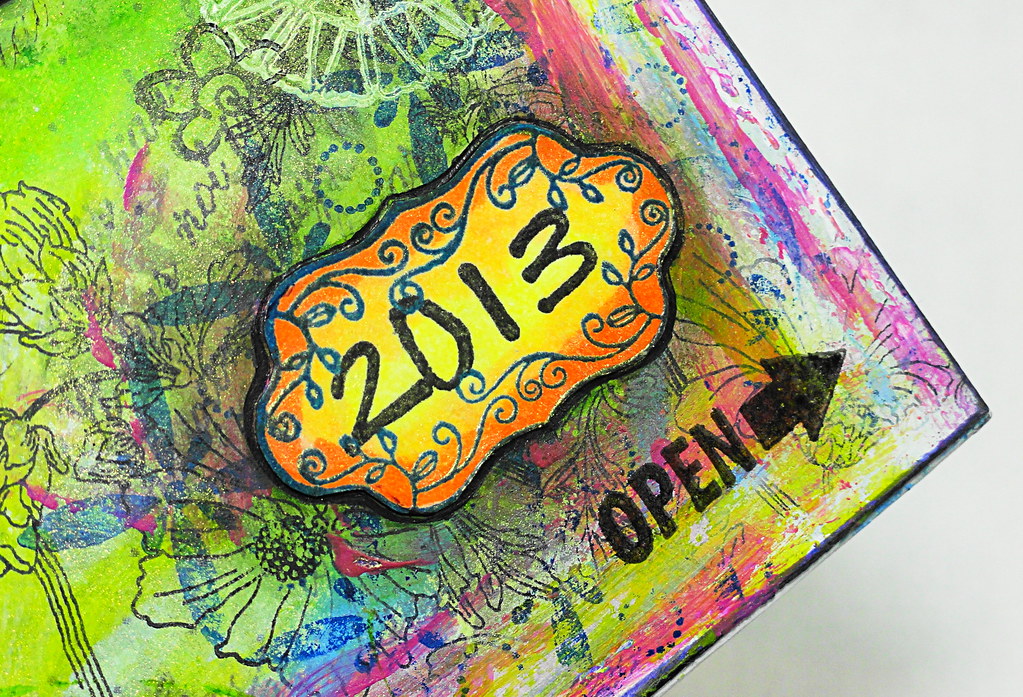


Zooming in....

DSC04207 (1)
Kisses in the Sun 4306L (Butterfly)


DSC04208 (1)
Melle Papillon 4300K


DSC04211 (1)
Venetian Summer 40-217


DSC04212 (1)
Embellishments 30-161 (Washi Tape)


DSC04213 (1)
Edge to Edge 30-164 (Sentiments)


DSC04210 (1)
Longing 40-196, Verdant 4310K, Trailing Beauty 40-207


DSC04209 (1)
Charms 30-173, Embellishments 30-161, Kate's Alphabet  30-168


Another exciting piece of news to share:
If you are wondering about the rubber stamps used in this project, they are hot off the press from Penny Black’s new 2013 Collection.  They are debuting their new catalog “here” and have all kinds of fun planned for the release.  Be sure to hop over and take a peek.

Smiles,
Elizabeth

Supplies:
Penny Black Stamps:  Melle Papillon 4300K, Kisses in the Sun 4306L, Verdant 4310K, Longing 40-196, Trailing Beauty 40-207, Venetian Summer 40-217, Indian Wheel 40-202, Edge to Edge 30-164, Love Chapter 30-163, Embellishments 30-161, Charms 30-173, Kate’s Alphabet 30-168
Image Crafts/Tsukineko: StazOn Inks, Memento Inks, Onyx Black VersaFine, Clear Embossing Powder, Sponge Daubers
Other: Acrylic Paints, Gesso, Mod Podge

April 9, 2012

Stamping Tips Video

Today I have a video to share that I made for Penny Black that has tips and techniques for using their "T" for Transparent stamps with Tsukineko's fabulous VersaFine inks.


Thank you for viewing!

I will be back tomorrow with a spring bouquet...

Elizabeth


February 28, 2012

Flower Gift Box & Video

This week on the Penny Black Blog they are featuring floral designs from their new Full of Surprises Collection.  

Today I am hosting their blog with a dimensional project which incorporates coloring with the new Memento ink colors three different ways – distressing, Brushstix coloring and watercoloring.


The patterned paper is a piece tan of cardstock which was stamped with Flamboyant in Olive Grove Memento ink.  Brushstixs were used to transfer Morocco, Love Letter and Zeal Teal Memento inks to the flowers. 


To give the paper a distressed, antique hue a jumbo sponge dauber with Peanut Brittle Memento ink was rubbed into the design.  The paper was then sprayed with Gold Sheer Shimmer Spritz for a soft metallic glow.


After you have traced your favorite box template onto the paper and assembled your box, highlights on the edges can be added with an Inkblusher (new sponge applicator by Tsukineko) and Vintage Sepia VersaFine ink. 

The flower accent, Sunburst, was stamped on watercolor paper three times with Onyx Black VersaFine ink and heat embossed with clear powder.  I used two full flowers and one center.


The top flower was colored with Morocco, Love Letter, Elderberry and Peanut Brittle Memento inks.  The second flower was colored with Olive Grove, Pistachio and Peanut Brittle.  To watercolor with the inks, pat the inkpad on a nonporous surface and transfer the ink with a damp paintbrush.  Clean the brush between colors.

This is a video showing the flowers being colored:


When the pieces have been colored and trimmed they are ready to be glazed.  A small amount of Goosebumps clear texture spray was poured onto a nonporous surface.  A chisel-tipped Brushstix was used to apply the Goosebumps.  When applying the glaze, use quick, even strokes without working the medium too much.  Since the flowers are created from watercolor paper, you do not want to pull and move the colors previously painted.

Slightly offset the flower elements and layer with dimensional foam and attach to the top of the prepared box.

You can view an additional video in this post “here” that shows the Brushstixs being used for coloring.

Thank you for visiting!

Elizabeth

Supplies:
Penny Black Stamps:  Flamboyant 4240K, Sunburst 4236K
3M Scotch: Dimensional Foam Tape
Basic Grey: Magnetic Snap (closure for the box)
Canson: Watercolor Paper
Tsukineko: Onyx Black VersaFine, Vintage Sepia VersaFine, Peanut Brittle Memento, Olive Grove Memento, Zeal Teal Memento, Pistachio Memento, Elderberry Memento, Morocco Memento, Love Letter Memento, Brushstix, Inkblushers, Gold Sheer Shimmer Spritz, Goosebumps Clear Texture Spray, Clear Embossing Powder

February 17, 2012

Coloring With Brushstixs (Tutorial & Video)

Hello Everyone!


Today I have a detailed tutorial with a video for this tag project featuring two of Penny Black’s new transparent sets (Flowers Sweet and Wishes) along with Tsukineko’s Brushstixs. 


These mixed media brushes were released at CHA and come in a wide array of styles.  The foam tips are fabulous for all sorts of projects and applications.  Plus, they are washable.

Below are detailed instructions for the tag as well as a video included in Step 3 that shows how the Brushstixs were used for coloring.  Enjoy…..


Step 1:  Die cut an oval from white cardstock.  Leave the metal die over the cardstock and apply Sea Breeze VersaMagic ink with a jumbo sponge dauber. 

Step 2: Remove the metal die and dust the cardstock with an anti-static pouch.  Stamp the flower and sentiment with Onyx Black VersaFine and heat emboss with clear powder.  Set aside.

Step 3:  On a separate piece of white cardstock, stamp the flower with Onyx Black VersaFine ink and heat emboss with clear powder.  Color with Brushstixs and Thatched Straw, Mango Madness and Red Magic VersaMagic inks.  For a visual reference using the Brushstixs, please view the video.


Note: The leaves on the main tag were also colored with Brushstixs, Aloe Vera VersaMagic and Tea Leaves VersaMagic.


Step 4: Trim the flower and spray with Sparkle Sheer Shimmer Spritz.

Step 5:  Align and attach the flower element to the prepared tag with dimensional foam.

Step 6:  Add a decorative ribbon.


Have a great weekend....

Elizabeth

Supplies:
Tsukineko: Brushstix, Onyx Black VersaFine, Sea Breeze VersaMagic, Thatched Straw VersaMagic, Mango Madness VersaMagic, Red Magic VersaMagic, Aloe Vera VersaMagic, Tea Leaves VersaMagic, Sparkle Sheer Shimmer Spritz, Jumbo Sponge Dauber, Clear Embossing Powder
Spellbinders: Classic Ovals Large (S4-110)
American Crafts: Elements Premium Ribbon – Aqua #4 

August 1, 2011

So Scary! (Card & Video)

They’re here!!  Penny Black has just released a spooky batch of Halloween designs.  The stamps will available at the end of August and Penny Black is letting us, the designers, share all the tangled web fun with you early!


This set called Scary Halloween will probably make you giggle more than tremble.  The expression this fluffy owl has says it all, but just in case, this sentiment fits perfectly.  


The spider web is part of trio on a large cling stamp called “Creepy Crawlies”.  After inking the stamp in black, it was stamped on a scrap piece of paper and the second, lighter impression was used for the card.  Prominent enough to show yet appear behind the embossed sentiment.  A bit of Copic color gives the web a soft glow.

Do you like the background paper?  No need to find this on-line.... you can create it yourself!  This is a new (shh… sneak peek) Christmas background stamp called Retro Pattern.  After stamping it on Penny Black’s Fall Festival cardstock (16-001) in black, it was distressed with Persimmon VersaMagic.  Trimming around the design gives the appearance of a die-cut piece of patterned paper.  Here is a short video on how I like to align these large stamp designs:


For this card, dimensional foam was placed under the owl/pumpkin and the black mat.

Hopefully this post wasn’t too terrifying and you will pop back to my studio for more ghoulish designs this week as well as visit the Penny Black Blog for other spooky inspiration.

Smiles,
Elizabeth

Penny Black “Mix & Match” Cardstock:  Storm 01-003, Fall Festival 16-001, Fern Green 05-001
Tsukineko:  Onyx Black VersaFine, Persimmon VersaMagic Clear Embossing Powder
Copic Markers
Tombow: Stamp Runner Permanent Adhesive
3M Scotch:  Dimensional Foam

June 3, 2011

A "Swing" Card

This little framed card has accordion folds so it can be flattened to mail and then popped open to display a swinging design element! 


These are some additional photos and a short video showing the card swinging that you can reference throughout the detailed instructions provided below.


Side view of incremental folds.


Inside back panel.

Extensions on hammock to wrap thread to create the swinging embellishment.


Side view of completed embellishments.


Instructions:

  • Cut a 3 ¾ x 8-inch piece of white cardstock, position horizontally and score vertical lines at 3 ½, 3 ¾, 4, 7 ½, 7 ¾ and 8.
  • Rotate the scored piece to the vertical position.  Center and stamp Posy Petals on the first segment of the cardstock with black ink and heat emboss with clear powder.  (In this sample the ladybug was not inked.)
  • Create a window by cutting out the area between the two flowers.  Note:  Be sure to leave enough at the top and bottom to join the two sides and also hide the accordion folds when assembled.
  • Add Tumbled Glass and Faded Jeans Distress inks around the flowers.
  • Fold on score lines to create an accordion card.  Note:  The last flap at the top will be the gluing tab, but leave it unsecured at this time so additional artwork can easily be added to the inside of the card.
  • Ink a 3 ¼ x 3 ¾-inch piece of white cardstock with Tumbled Glass and Faded Jeans Distress ink.  Stamp Zen with Faded Jeans ink over the distress inks.  Accent the stamped pattern with a white gel pen.  Adhere the cardstock to the inside back panel with adhesive.
  • Stamp Posy Petals multiple times on white cardstock with black ink and heat emboss with clear powder.  Color and trim individual elements to create layers for the flowers, leaves and to build the little girl in the hammock.  In this sample, three layers were combined to create a dimensional element.  Save one ladybug for an embellishment.
  • When trimming the layers for the swinging hammock, be sure to leave an extended portion of cardstock on either side of the image.  This will provide an area to wrap thread around to hang the embellishment and allow it to swing.  Coat the thread wrappings with Glossy Accents.
  • Align the hammock in the window so the ends match up with the bows.  Secure the threads at the top of the card and trim the ends.
  • While the card is still “open”, stamp Thinking Around on white cardstock with black ink and heat emboss with clear powder.  Trim with either a circle punch or a circle Spellbinder’s die.  Distress the edges with Tumbled Glass Distress ink.  Attach to the inside of the card with dimensional foam.
  • Stamp grass on white cardstock with black ink and heat emboss with clear powder.  Color and trim to fit across the bottom of the card.   Attach with dimensional foam.
  • Glue the card closed.
  • Accent the card with the prepared flowers, leaves and ladybug.
  • Now all that is left to do is wiggle the card and see the hammock swing!

Video (without sound) showing the swinging hammock.


If you enjoy creating cards with frames and/or borders, be sure to visit the Penny Black Blog to participate in this week's reader challenge.  

Thank you so much for your visits and lovely comments.  They are greatly appreciated and enjoyed immensely!

Happy Friday,
Elizabeth

Supplies:
Tsukineko: Onyx Black VersaFine, Jumbo Sponge Daubers
Ranger: Tumbled Glass Distress Ink, Faded Jeans Distress Ink, Glossy Accents, Super Fine Detail Clear Embossing Powder
Copic Makers
Tombow: Stamp Runner Permanent Adhesive
3M Scotch: Dimensional Foam Tape
Spellbinders: Circle Nestability


March 21, 2011

Fabric Stamping Video

As you can tell from many of my posts, I enjoy using my rubber stamps in all kinds of different ways. 

Today's project features stamping on fabric.  


I found these wonderful flour sack dish towels at the Dollar Store.  Not only are they great gifts, but they make wonderful wrappings for home baked treats. 

Here is a short video showing how quick and easy these are to make with transparent stamps from Penny Black.


Tip:  To clean the transparent stamp between colors or immediately at the end of the project, simply rinse under water.

While the Adirondack acrylic paint requires heat setting for permanency, Fabrico markers do not.   

Try stamping on clothing and pillowcases too!  You'll love the look.

In case you missed these other stamped home decor projects using Penny Black stamps, you can click here to view a lotion/soap dispenser and here for a summery lampshade.

Have a great day,
Elizabeth

Supplies:
Penny Black Stamps:  30-068 Trims
Ranger:  Adirondack Acrylic Paint Dabbers (Citrus, Raspberry)
Tsukineko: Fabrico Markers (Lemon Yellow, Tangerine)

March 4, 2011

Celebrate Today... (With a Card & Video)

This is a card that I designed for a Penny Black make-n-take at the CHA Winter Convention and demonstrated in England at the CHSI Convention.

Lots of color without coloring!


Here is a short video I made to accompany the instructions below. 


  • Stamp flowers with black dye ink on colored cardstocks and trim.
  • Edge each flower with a black marker and highlight the center of the small flower with a pink marker.
  • Spray the flower with Sparkle Shimmer Spritz and create soft bends.
  • Stamp the green strip with Spanish Moss and the wave pattern.
  • Stamp the orange cardstock with the hatch pattern and Persimmon ink.
  • Assemble with dimensional foam under the strip, flowers and sentiment.
  • Accent the flower with a stamped button and twine.

 
I really like this sentiment.  It reminds me that each day is a celebration……

 
Thank you for visiting and viewing.

Enjoy your weekend,

Elizabeth


Supplies:
Penny Black Mix & Match Cardstock:  Spring Meadows 06-001, Rose Garden 14-001, 14-002, Summer Sun 17-002
Tsukineko:  Onyx Black VersaFine, Spanish Moss VersaFine, Tuxedo Black Memento, Persimmon VersaMagic, Memento Markers: PM900 Tuxedo Black, PM404 Angel Pink, Sparkle Sheer Shimmer Spritz
Ranger:  Glossy Accents (used as an adhesive between the flowers, button and twine)
3M Scotch: Foam Mounting Tape
Tombow:  Permanent Adhesive Tape Runner

February 11, 2011

To You

Hello Everyone. 

I would like to share one of the cards that I taught at the recent CHA convention in Los Angeles using the new stamps and cardstocks from Penny Black's Charm of Spring 2011.

Along with fellow design team member
 
Kathy Racoosin, we taught four different make-n-takes.   Each cardmaking session was a ½-hour which gave retailers plenty of time to work with all the new stamps, learn fun techniques and to chat with us! 


This card features masking, background overstamping and using markers as the ink source for the stamped impression. 


Here you can see how beautiful and delicate the
Paisley Outline stamp is.


Below is a short summary of the steps used to create the card.  You can also view a short video that was shot LIVE from CHA which is linked here at Penny Black.  (I am not used to having more than my hands visible in a video :0)

Instructions:
  • Using Judi-Kins Eclipse Tape, mask off 3/8” on each side of a 3 3/8 x 4 3/8-inch piece of white cardstock.
  • Rub Thatched Straw VersaMagic ink in the exposed “window” area.
  • Stamp Paisley Outline over the ink in Brilliance Galaxy Gold.
  • Remove the masks from the top and sides leaving the bottom strip in place.
  • Apply ink from the markers directly to the flower stamp, mist lightly with water and stamp over the inked background.
  • Remove bottom mask strip.
  • Attach sentiment with dimensional foam and layer with colored cardstocks.
  • Accent small flowers with USArtQuest Interference Blue Watercolor and add Stickles as desired.

Thank you all for your visits and kind comments!!

Elizabeth


Supplies:
Penny Black Stamps:  Flower Amongst Flowers, 40-048 Paisley Outline, 30-037 To You
Penny Black Mix & Match Cardstock:  13-003, 14-003
Tsukineko:  Black VersaFine, Brilliance Galaxy Gold, Thatched Straw VersaMagic, Gold Metallic StazOn, Daubers
Tombow:  Markers - 177, 553, 665, 985; Mono Permanent Adhesive
Ranger:  Tropical Tangerine and Waterfall Stickles; Mini Misters
USArtQuest: Blue Interference Watercolor from the Jewelz Duo & Interference Watercolor Palette
Judi-Kins:  Eclipse Tape
3M Scotch:  Foam Mounting Tape 

January 28, 2011

Amour Card and Video

When I made today's card I was totally focused on the upcoming Valentine holiday.  Then I decided that this card could also be given for a wedding, engagement congratulation or even an anniversary.     


If you would like to view a VIDEO with step-by-step instructions, click here.


In this photo you can see that the Amour band was created from two slits in the white cardstock base.

I hope you enjoy the video.

Thank you for viewing,
Elizabeth


Supplies:
Tsukineko:  Orchid Brilliance Pearlescent, Orange Brilliance Pearlescent, Tuxedo Black Memento, Lilac Posies Memento, Sparkle Sheer Shimmer Spritz, Sponge Daubers
Copic Markers
Other:  Crystal Gem


December 3, 2010

Hugs & Kisses - Card & Video

Love is in the air and Penny Black has just released their new Valentine designs.  Their mini catalog is filled with everything from elegant to fun images.  Mimi is back for the holiday with her friend Miles as well as the Fashion Girls straight from Paris.        

There were so many new designs that it was hard to decide which to use first.  Because I couldn’t pick just one, I combined three!

If you would like to view a tutorial video for this card, click here.

Using a black Memento dye marker, I colored the sections of the stamp “All Mine” that I wanted to incorporate into my design.  After stamping the inked image I then added the sentiment from Purr-fect Message.  The decorative border on the orange cardstock was stamped with Love Song in Lilac Posies Memento ink.


To give the design added dimension, I stamped an extra set of bees and attached them with dimensional foam.  If you find that your sparkle gel pen looks a little thick when applying, rub the ink with your finger while it is still wet to get a light and airy effect.  I did this on the bee wings.

All the coloring was done with Copic markers.  The heart was accented with red Stickles and crystal gemstones were placed in the centers of the smaller flowers.

If you would like to see all the wonderful new Penny Black Valentine releases, you can view the 2011 Amour catalog here.
 
Thank you for visiting and have great weekend.  

Elizabeth


October 27, 2010

Technique Cards With Videos

Happy Wednesday Friends!

I hope you have been enjoying Technique Week over at the Penny Black Blog and thank you so much for all the kind comments you left regarding my Vintage Enamel Tile Tag.

To keep with this week’s theme of techniques I wanted to share two cards with you that have really quick ideas that create dramatic results.  I find that “a picture is worth a thousand words” and thought you might enjoy seeing tutorial videos for today’s cards.   Click here to view To Follow A Star and Starlit Christmas. 

The first card uses alcohol inks.  I enjoy working with these inks because you always get a terrific result on glossy cardstock.  I paired this technique with Penny Black’s “To Follow A Star” mixed media stamp.  I really like the mottled background effect.  It offers deep, rich color without detracting from the stamp design.  If you are looking for a great “gold” ink you might want to check out Tsukineko’s Gold Metallic StazOn.  It’s a true rich gold and is one of my favorites.  I used it to create the gold matting paper and stamped dots for this design.


Penny Black:  To Follow The Star 4112K, Peace On The Horizon 3988H, Crystalline 30-018


This second card uses Copics to create fast, fun trees.  No fussy coloring needed!  One thing I look for in stamps is versatility.  I like the fact that the “Starlit” rubber stamp is not only a beautiful stand-alone piece, but it can create terrific background patterns too.


Penny Black:  Starlit 4105J, A Wonderful Christmas 4116H, Giving and Receiving 30-007


Thank you for visiting.  I hope you have a day filled with creativity and inspiration.

Elizabeth