April 30, 2012

Fantastic Sister

Good morning everyone!  This week the sneak peeks continue on the Penny Black Blog where they are showcasing more of their soon to be released new stamps. 


Today I am using Word Express for this colorful greeting.  This transparent set is fantastic for creating endless phrase combinations, “texty” backgrounds or for shouting out a happy expression.  In this sample, the words were stamped on colored cardstocks and adorn a tall flower. 

By intermixing sets, the flower was assembled from Floral Thread and Puzzle Parts and positioned on a slightly trimmed Reverse Wonky Rectangle die cut from white cardstock.  Puzzle Parts, which you will see more of on Wednesday with Floral Thread, was also used to make the lattice patterned paper.

TIP/HINT:  To create a soft glow on cardstocks, lightly burnish the edges with a coordinating ink.  These Penny Black cardstocks were highlighted with sponge daubers and Memento inks.

Have a great day,
Elizabeth

Supplies:
Penny Black Mix & Match Cardstock: Storm 01-001, Fern Green 05-002, Clear Skies 10-002, Rose Garden 14-002, Summer Sun 17-003
3M Scotch: Dimensional Foam
Copic Markers
Spellbinders: Reverse Wonky Rectangles (S4-307)
Tsukineko: Onyx Black VersaFine, Olympia Green VersaFine, Tuxedo Black Memento, Tangelo Memento, Lilac Posies Memento, Love Letter Memento, Clear Embossing Powder, Sponge Daubers
Other: Paper Piercing Tool

April 26, 2012

ConGRADulations!

The sneak peeks are continuing on Penny Black’s blog and today the feature is this wise owl called “Word to the Wise”.


This congratulatory design is elongated with a small pocket inside to hold a monetary gift.

The Grand Canyon cardstock base was stamped with Allover Pattern in Espresso Truffle Memento ink.  White cardstock edged with Peanut Brittle Memento was matted with Black and Clear Skies cardstocks then elevated on the card with dimensional foam.

The owl has dimensional components consisting of the graduation cap and wings.  A hand-cut banner stamped with the sentiment in Onyx Black was tinted with Summer Sky Memento ink and a sponge dauber. 

Last, but not least, every grad needs a gold star!

More new releases coming next week!!!

Elizabeth

Supplies:
Penny Black Mix & Match Cardstock: Storm 01-001, 01-003; Grand Canyon 03-002, Clear Skies 10-002
Copic Markers
Dimensional Foam: 3M Scotch & EK Success
Tsukineko: Onyx Black VersaFine, Summer Sky Memento, Peanut Brittle Memento, Espresso Truffle Memento, Clear Embossing Powder, Sponge Daubers

April 25, 2012

A Mother's Day Silhouette

Penny Black’s new So Blessed is a lovely silhouette with a selection of wonderful sentiments.  With the special occasion of Mother’s Day approaching, I created a vintage card.


The three patterned papers seen in this design were all created with another new set called Puzzle PartsNot only are these fabulous patterns, but matching up the designs is a SNAP!!  The transparent set allows for easy alignment which eliminates the need for a stamp positioner and the designs are drawn to nestle together to create larger patterns.

Here’s how the components were created:

Card Base:
The lattice pattern was stamped multiple times on white cardstock with Onyx Black VersaFine ink and heat embossed with clear powder.  A section was trimmed to create the shaped base and was then tinted with Peanut Brittle Memento Ink.  The small frames were colored with Memento Markers (Angel Pink, Lilac Posies).  For a vintage flair, the interior part of the design was distressed with additional Peanut Brittle Memento and a Brushstix.

Pink Mat:
A piece of Penny Black’s Fuchsia Fantasies cardstock was stamped with the medallion pattern in Lilac Posies Memento ink.  The same ink color was added to the edges with a sponge dauber to soften the design.  Accents from a white gel pen were also added to the pattern. 

Teal Accent Strip:
Penny Black’s Blue Lagoon cardstock was stamped with the mesh pattern in Tuxedo Black Memento.

Oval Frame and Medallion:
Spellbinders oval and circle die cuts from white cardstock were distressed with Peanut Brittle and Lilac Posies Memento inks.  The sentiment is part of So Blessed.

Silhouette:
The silhouette was stamped on white cardstock with Onyx Black VersaFine ink and heat embossed with clear powder.  A combination of Copic and Memento markers were used to add a touch of color.  The image was fussy cut and dimension was created with an additional hat and umbrella.

TIP/HINT:  A black glaze pen makes wonderful brad-like accents.  A small dot from the pen created the “brad” on the sentiment medallion.

I will be back tomorrow with another new Penny Black image!

Elizabeth


Supplies:
Penny Black Mix & Match Cardstock: Storm, 01-001, Blue Lagoon 09-003, Fuchsia Fantasies 13-001
3M Scotch: Dimensional Foam Tape
Copic Markers
Sakura: Black Glaze Pen, White Gel Pen
Spellbinders: Standard Circles Small (S4-116), Classic Ovals Large (S4-110)
Tsukineko: Onyx Black VersaFine, Peanut Brittle Memento, Lilac Posies Memento, Teal Zeal Memento, Tuxedo Black Memento, Sponge Daubers, Memento Markers (Angel Pink, Lilac Posies), Brushstixs
Other: Paper Piercing Tool

April 24, 2012

Fantastic Graduation

Exciting news…. Penny Black is showing sneak peeks of their new upcoming release on their blog!  For the next two weeks you will get special previews of the new stamps and projects from the designers.

Today is a proud day for followers of Mimi.  She is graduating!


4264J

An extra cap, hair bows and a diploma make fun layering accents for added dimension.


30-106
The banner from Sweet Wishes is the perfect size to hold the sentiments from the new Word Express set.  The combination of phrases you can make with this set is endless!


30-114
Another fabulous transparent set is Puzzle Parts.  These borders transition from fun to elegant as you will see in another sample tomorrow.  For this card, two of the designs were stamped with Memento and VersaFine inks on Penny Black’s Mix & Match Papers to create festive patterns.

To personalize the card for the recipient, the graduation year was added to the upper right corner.  Numbers from Kate Text were inserted in the rectangular stamp design from Air Mail.

TIP/HINT:  Adding a bit of stamped paper to the inside of the card is a quick way to form a pocket to hold a special celebratory gift of money or a certificate.

A little hint for tomorrow’s sneak peek – Silhouette!

Smiles,
Elizabeth

Supplies:
Penny Black Mix & Match Cardstock: Storm 01-001, Olive Grove 04-001, Fuchsia Fantasies 13-001
Copic Markers
Dimensional Foam: 3M Scotch, EK Success
Tsukineko: Onyx Black VersaFine, Spanish Moss VersaFine, Lilac Posies Memento, Clear Embosssing Powder, Sponge Daubers

April 20, 2012

Pocket Full of Posies

Today’s project captures the essence of the large resist background in a coordinating medallion.


While the two flower designs do not match exactly, there is the illusion that the medallion is a smaller, colored snapshot of the larger pattern.

The bottom portion of the card is a pocket of white cardstock stamped with Posies in VersaMark Watermark ink and heat embossed with clear powder.  Nautical Blue and Cantaloupe Memento inks were applied with sponge daubers over the embossed design.  A damp tissue was used to “buff” away the ink from the embossed areas revealing the resist pattern.


The sliding portion was cut from Summer Sun cardstock and scored to create an overhanging tab.  The tab was then trimmed with Spellbinders Labels Twenty-Two.  The background from Warm Wishes was stamped in Tangelo Memento and highlights were added with the same color.

The medallion is two scalloped circles die cut from white cardstock.  One is the base which was stamped with the circular flower image from Wishes with Majestic Blue VersaFine and heat embossed with clear powder.  The flowers were then colored with Memento markers.  The second scalloped circle was die cut with a smaller standard circle to create a small window.  After distressing with Nautical Blue Memento it was elevated on top of the first piece with dimensional foam. 

Small pearls and a tiny ribbon accent the completed piece.

Wishing you a colorful weekend,
Elizabeth

Supplies:
Penny Black Mix & Match Cardstock: Summer Sun 17-003
3M Scotch: Dimensional Foam Tape
Making Memories: Ribbon from Celery Collection
Mark Richards: Pearl Stickers
Tsukineko: Majestic Blue VersaFine, Cantaloupe Memento, Tangelo Memento, Nautical Blue Memento, VersaMark Watermark Ink, Memento Markers (Dandelion #100, Cantaloupe #103, Tangelo #200), Clear Embossing Powder, Sponge Daubers
Spellbinders: Standard Circles Sm. (S4-116), Classic Scallop Circles Lg.  (S4-124), Labels Twenty-Two (S4-346)

April 18, 2012

Dreamy

This stamp, Dreamy, is so appropriately named.  I love the wispy and delicate lines of this beautiful flower. 


The card base and first layer were constructed from Penny Black’s cream cardstock called Sticks & Stones (02-001). 


Before the first mat was elevated onto the card, Delicata Golden Glitz ink was applied directly from the pad to the edges and heat embossed with gold powder.

Dreamy was stamped on a Spellbinders Labels Seventeen die cut from white cardstock.  The top of the flower was inked with Teal Zeal Memento and the stem with Olive Grove Memento.  The flower top was heat embossed with clear powder to enhance the elegant lines of the design.

Tip/Hint:  To suspend the drying time of dye ink so heat embossing can be implemented, first ink the image with VersaMark Watermark ink and then apply the dye ink directly on top.  Stamp the image and immediately apply clear embossing powder.  Tap off the excess powder and heat set.


A small amount of Ink Potion No. 9 was poured into a little dish for watercoloring with the Memento inks.   This solution helps encourage the migration of the inks and resists paper curling when dried.  Lilac Posies, Cantaloupe and Teal Zeal Memento inks were applied to a plastic surface and transferred with a paintbrush using the Ink Potion for blending as well as cleaning between colors.

Tip/Hint:  Either markers or ink pads can be used for the source of ink.

When dry, the piece was distressed with Cantaloupe, Peanut Brittle and Espresso Truffle Memento inks.  Music Background was then stamped over the entire piece in Peanut Brittle Memento ink. 

Tip/Hint:  Stamping a background over an existing image without a mask may seem daunting; however, when using a lighter ink tone the main image will not be affected and the background will seamlessly appear to blend behind the main focal point.

The piece was then layered with another Labels Seventeen die cut from Rose Garden (14-003) cardstock.  To deepen the color, Crimson Red VersaFine and Elderberry Memento inks were applied to the edges.


The sentiment from Sweet Wishes was stamped on white cardstock with Onyx Black VersaFine and heat embossed with clear powder.  The tag shape was hand drawn and trimmed.  A tiny brad colored with a teal Sharpie was inserted for a decorative embellishment.

The last step after the card was assembled was to trace the flower lines with a glue pen and then add teal glitter.

Have a dreamy day,
Elizabeth

Supplies:
Penny Black Mix & Match Cardstock: Sticks & Stones 02-001, Rose Garden 14-003
3M Scotch: Dimensional Foam Tape
Martha Stewart: Lapis Glitter
Sharpie: Teal
Tsukineko: Onyx Black VersaFine, Crimson Red VersaFine, Elderberry Memento, Cantaloupe Memento, Olive Grove Memento, Teal Zeal Memento, Lilac Posies Memento, Peanut Brittle Memento, Espresso Truffle Memento, VersaMark Watermark Ink, Delicata Golden Glitz, Ink Potion No. 9, Clear Embossing Powder, Gold Embossing Powder, Jumbo Sponge Daubers
Other: Mini Brad, Glue Pen, Paintbrush

April 16, 2012

Sending Hugs

Dialing up lots of special hugs…..


This dimensional piece has two display options.  One is a small stand for placement on a bookshelf or window sill.  The second is a magnet for refrigerator art. 

The telephone booth originally started with London Calling.

It was then altered with:
  • The addition of the chicken from On Guard.
  • The addition of the cat from London Cabby.
  • The addition of the sentiment “lot of hugs” from Sweet Wishes.
  • The substitution of “sending you” from Sweet Wishes for the word “telephone”.


To give the phone booth depth, three layers were added to the base of the design.

Have a happy day and hugs to you,
Elizabeth

Supplies:
3M Scotch: Dimensional Foam Tape
EK Success: 3D Dots
Copic Markers
Tsukineko: Onyx Black VersaFine, Pear Tart Memento, Olive Grove Memento, Clear Embossing Powder, Sponge Daubers


April 13, 2012

Frame Card Art & Hidden Tag

Decorative card frames can be created in no time at all by combining die cuts, inks and stamps!


This antique frame was designed with Spellbinder’s Labels 22 and Large Classic Ovals.  Memento inks in Espresso Truffle, Toffee Crunch, Peanut Brittle and Angel Pink were applied to the white cardstock die cuts with jumbo sponge daubers and then stamped with Letter Background before assembly.

Penny Black’s hydrangea from Flower Festival was stamped with Onyx Black VersaFine on watercolor paper and heat embossed with clear powder.  After watercoloring and trimming the image, the flower centers were accented with a black Glaze pen.  A small sentiment from Wishes was tucked under the leaves.  The soft background behind the oval window is Penny Black’s Periwinkle cardstock.

There is a hidden tag...


A small pocket nestled between the layers helps the tag glide smoothly in and out.


For the card base, a separate die cut was scored to create a gluing tab.  Having an easel base for cards with extra layers will lend stability and keep the card from “slumping” when on display.


TIP/HINT:
For consistent and even placement of brads positioned on corners, a handmade template is a handy tool.  Mark the position of the first hole with a piercing on a “scrap corner”. 


This will become the guide for piercing for the remaining corners.  The template will need to be turned and rotated as you proceed from one corner to the next.  Align the template corner with the project corner and pierce the hole position.

A heartfelt “thank you” to all that visit as well as the readers who invite me into their homes by subscribing to my posts via e-mail.  Your kindness and support are greatly appreciated!

Smiles,
Elizabeth

Supplies:
Penny Black Mix & Match Cardstock: Storm 01-001, Periwinkle 11-001
Canson: Watercolor Paper
Spellbinders: Classic Ovals Large (S4-110), Labels 22 (S4-346)
Sakura: Black Glaze Pen
Tsukineko: Onyx Black VersaFine, Espresso Truffle Memento, Toffee Crunch Memento, Peanut Brittle Memento, Angel Pink Memento, Jumbo Sponge Daubers, Clear Embossing Powder
Other: Paper Piercing Tool

April 10, 2012

Shabby Chic Bouquet

For the next two weeks, the Penny Black Blog is having a Spring Fling!  Each day a different design team member will be showcasing a new spring card or project.

Today I am hosting the event “here” with these shabby chic flowers.
To make this bouquet of good wishes: 
  1. Die cut three scalloped circles from watercolor paper. (Small, medium, large)
  2. Stamp “Flower Garden” with Tuxedo Black Memento ink on the scalloped circles.
  3. Punch a small hole in the center of each circle and cut small slits from the outer edges toward the center.
  4. Spray pieces with Tsukineko's Fireworks Craft Spray.  Let dry slightly.
  5. Bend the cut tabs to create petals.
  6. Secure a black bead at the end of a florist wire.
  7. Thread the components (from smallest to largest) onto the wire adding a small drop of glue around the wire between each segment.  (One flower will be completed at this point.  Repeat as desired for additional flowers.)
  8. Wrap stems/wires with twill tape distressed with Peanut Brittle and Olive Grove Memento inks.
  9. Accent with a pink silk ribbon aged with Peanut Brittle Memento ink and a sentiment.
Have a beautiful day,
Elizabeth

Supplies:
Penny Black Stamps: Flower Garden 4242K, Wishes 30-103
Canson: Watercolor Paper
Spellbinders: Classic Scalloped Circles (Large & Small)
Tsukineko: Tuxedo Black Memento, Peanut Brittle Memento, Olive Grove Memento, Fireworks Craft Spray: Lilac Posies, Rose Bud, Tangelo, Angel Pink, Cantaloupe, Pear Tart, Summer Sky
Other: Florist Wire, Black Beads, Pink Silk Ribbon, Twill Tape

April 9, 2012

Stamping Tips Video

Today I have a video to share that I made for Penny Black that has tips and techniques for using their "T" for Transparent stamps with Tsukineko's fabulous VersaFine inks.


Thank you for viewing!

I will be back tomorrow with a spring bouquet...

Elizabeth


April 6, 2012

Happy Easter Chicks

A tiny greeting….

Finished Size:  1 3/4 x 3 1/8

These Penny Black chicks were originally marching in a single line.  I couldn't help myself from repositioning them to create a tower of holiday delight.  

May your baskets be filled with love, happiness and chocolate!

Easter Blessings,
Elizabeth

Supplies:
Penny Black Stamps: Spring Day 30-099
Penny Black Mix & Match Cardstock: Storm 01-001, Fuchsia Fantasies 13-002
Copic Markers
3M Scotch Foam Tape
Tsukineko: Onyx Black VersaFine, Lilac Posies Memento, Pear Tart Memento, Summer Sky Memento, Sponge Daubers, Clear Embossing Powder

April 4, 2012

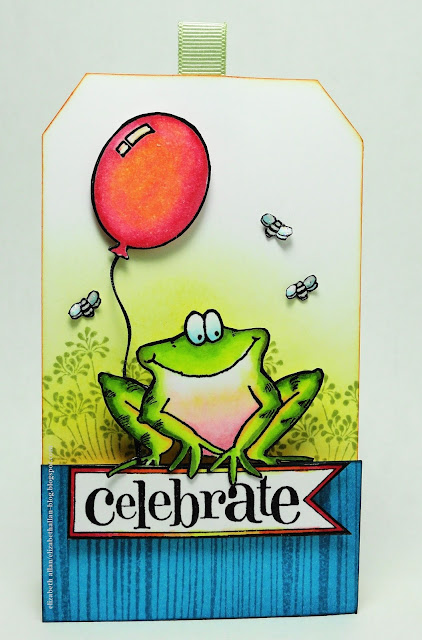
Celebrate Tag

Whimsical fun with Penny Black stamps…

Finished Size: 2 1/2 x 4 1/4

The tag base is a 2 ½ x 4 ¼-inch piece of white cardstock.  The lower portion elevated with foam is a 1 ¼ x 2 ½-inch piece of Blue Lagoon cardstock stamped with Inspiring in Teal Zeal Memento ink.  The edges of the piece were softened with the same ink and a sponge dauber.

A highlighting of Cantaloupe Memento ink was added above the elevated teal strip and stamped with Fanciful in Pistachio Memento ink.

The balloon, banner and sentiment are all from Sweet Wishes and the frog is a portion of Toadily Happy.  After the images were stamped and colored they were trimmed and assembled as shown.

Tip/Hint:  To put a “wave” in the balloon string, turn the balloon one full rotation after both ends of the thread have been secured.  This will add a twist to the string and give the effect of movement.

There is a whole day of tag inspiration “here” by the Penny Black designers!  Enjoy taking a peek!

Elizabeth

Supplies:
Penny Black Mix & Match Cardstock: Blue Lagoon 09-002
3M Scotch: Dimensional Foam Tape
Copic Markers
Tsukineko: Onyx Black VersaFine, Cantaloupe Memento, Cantaloupe Memento Marker, Pistachio Memento, Teal Zeal Memento, Sponge Daubers, Clear Embossing Powder
Other: Heavy Black Thread

April 2, 2012

Dropping You A Line

A high-tech note to be sent via snail mail…..


After partially trimming “Your Way”, it was elevated on a piece of white cardstock distressed with London Fog Memento ink.  A strip of a wood grain (Inspiring) stamped in Espresso Truffle Memento ink on Grand Canyon cardstock was added to the matted layers.

To mimic the tiny Post-its hanging from the computer screen, I created a large note with the sentiment from “Dropping You A Line”, a staple and a slightly crimped corner.

Thank you for visiting and all your notes…
Elizabeth

Supplies:
Penny Black Mix & Match Cardstock: Storm 01-001, 01-002, 01-003; Grand Canyon 03-002
Copic Markers
Dimensional Foam: 3M Scotch / EK Success
Tsukineko: Onyx Black VersaFine, London Fog Memento, Espresso Truffle Memento