May 31, 2011

Graduation Cards

Congrats for the graduate…..


Finished Size:  3 1/4 x 4 3/4
Penny Black has wonderful alphabet and number sets.  Everything from small script to bold block letters.  This transparent number set appropriately titled “Who’s Counting?” contains doodled numbers that are 1 ½ inches tall making them fun to color and a snap to trim.


Big polka dots stamped in two colors and crystal Stickles add to the festivity.  The cap is from A Scholar. 


Published in Crafts ‘n Things June 2010. 

This is another graduation card that I made for last year which was published in Crafts ‘n Things June 2010.


It has a pocket on the inside to tuck a little something for the grad.


Published in CardMaker. 
Instructions and materials list for this card are available in the May 2011 issue or can be downloaded in a digital version from  www.cardmakermagazine.com

You can see another one of my graduation cards in the current issue (May 2011) of CardMaker on page 76.

If you are interested in other published works, please feel free to click on the Artist Highlights tab at the top of the blog to view a listing of magazines featuring my art.

To all the graduates of 2011 – Congratulations!

Elizabeth

Supplies:
2011 Congratulations
Penny Black “Mix & Match” Cardstock:  Sea Breeze 08-003
Canson: Watercolor Paper
Tsukineko: Onyx Black VersaFine, Wheat VersaMagic, Aquatic Splash VersaMagic
Tombow: Dual Brush Pens, Stamp Runner Permanent Adhesive
Ranger: Crystal Stickles
3M Scotch: Dimensional Foam 

2010 Congratulations:
Penny Black Stamps: Graduates 3933K, Congratulations 3934H, Congrats 3850E, Kate Brushstroke Uppercase Alphabet 20-001

Celebrate Your Day:
Penny Black Stamps: A Scholar 40-018, Congrats 3850E (inside on pocket)

May 27, 2011

Tagged With Love

A friend recently asked me about my creative process and how I approach creating my artwork.  After some thought, I realized that I don’t have a “set” approach and it can vary from wanting to use a specific color, design or shape to building it around a sentiment or phrase.

This little tag/card is the perfect example of that “no-approach” approach.


From the moment I saw this little dog as a part of Every Pet’s Dream I knew that I wanted to use him in such a way that he would be the focal point.  From there, everything else just fell into place.

The tag/card was scaled down to compliment the size of the stamped image.  With images from the Airmail set, I added the “to” salutation and used the bar code to make a semi-enclosed dimensional platform. 


These are the “behind the scene” images used to create the elevated artwork that disguise the dimensional foam.


The “pegs” on the bottom of the dog’s feet allow the image to be attached to the platform and serve as a base for the final artwork.  You could use just the one image, but I like the added thickness of the two stacked on top of each other.

The base of the card is built by cutting two pieces of white cardstock that measure 2 ¼ x 3 ½.  The back piece is scored  ¾-inch from the top.  When the two pieces of cardstock are being adhered together a small jewelry tag is inserted into the seam.  The twine is from a shipping tag that was colored with a Copic marker.


Those little “o’s” in the words love were the perfect size to place a crystal gemstone!

I hope all of you are tagged with love today.

I will be back on Tuesday with some graduation cards.

Have a wonderful Memorial Day weekend,

Elizabeth

Supplies:
Penny Black “Mix & Match” Cardstock:  Olive Grove 04-001
Tsukineko: Onyx Black VersaFine
Ranger: Peeled Paint Distress Ink, Tumbled Glass Distress Ink, Super Fine Detail Clear Embossing Powder, Crystal Stickles (bow), Glossy Accents (adhesive for small areas)
Copic Markers
3M Scotch:  Dimensional Foam Tape
Mark Richards: Crystal Gemstones    
Avery: Jewelry Tag


May 25, 2011

A Gentle Breeze

Along with a combination of new stamp images from Penny Black’s “Touch of Whimsy” catalog, today’s card demonstrates how to create your own paper-pieced elements.


The first example of paper piecing is the balloon.  When you view the links for the stamps listed below, you'll notice that a only a small portion of the kite string was inked giving me the opportunity to substitute a balloon for the kite.


Traditionally paper piecing is done by stamping the image multiple times on different papers to piece the main image with solid cardstock or patterned papers.  Here I used a variation of that concept.  The paper-piecing elements were created by stamping the image on watercolor paper.  The elements were then water colored and layered without dimensional foam.


These are the detailed instructions for today's card:
  • Create a 3 ¼ x 5 1/8-inch top fold card from white cardstock.
  • Stamp Paisley Outline with Toffee ink on a 3 ¼ x 5 1/8-inch piece of olive cardstock.  Ink the edges with Vintage Photo Distress Ink.  Adhere to the front of the prepared card.
  • Stamp the sentiment at the top of a 2 ¾ x 4 5/8-inch piece of white cardstock in black ink and heat emboss with clear powder.
  • Ink the bear and a small portion of the kite string with black ink and stamp under the sentiment.  Heat emboss with clear powder.
  • Add highlighting around the bear and color the grass with Copic markers.  Mat with a 2 7/8 x 4 ¾-inch piece of dark blue cardstock.  Attach to the front the prepared card with dimensional foam.
  • Stamp the bear three times on watercolor paper with black ink and heat emboss with clear powder.
  • On the first image, color the bear’s head, arms and shoes using water coloring techniques.  Trim the full image and set aside.
  • On the second image, color the shirt.  When trimming, cut out the shirt along with the connected portion of the overalls.  Set aside.
  • On the third image, color the overalls.  Trim the overalls.
  • To assemble the layers with adhesive, start with the full image and place the shirt with the overalls on top.  Place the third layer (the overalls) on top.
  • Using the stamped image on the front of the card for alignment, glue the paper-pieced accent into place.
  • Stamp the balloon from “Scooting Along” on watercolor paper, color and trim.  Attach to the card with adhesive.
  • Use a fine-tipped black pen to add additional string to connect the balloon to the bear.

Thank you for your visits.

Have a beautiful day,
Elizabeth

Supplies:
Penny Black “Mix & Match” Cardstock: Sticks & Stones 01-001, Olive Grove 04-001, Clear Skies 10-003
Canson: 140 lb. Watercolor Paper
Tsukineko: Onyx Black VersaFine, Toffee VersaFine
Tombow: Dual Brush Pens, Stamp Runner Permanent Adhesive
Ranger: Vintage Photo Distress Ink, Super Fine Detail Embossing Powder
Copic Markers: B0000, B000, B00, YG03, YG05, YG07 (sky and grass backgrounds)
3M Scotch:  Dimensional Foam Tape

May 23, 2011

Thinking of You (Four in a Flash)

This was a group of cards that I made using the new Touch of Whimsy transparent set from Penny Black.  I love clean and simple cards and these were fast and fun to create.


For added interest, I let the stem of the flower extend below the tabbed sentiment.


The stem for this tiny flower was created by stamping another flower in the set on white cardstock, heat embossing it in white and adding distress inks.  I like the contrast of this itty bitty flower on the card.  


The umbrella in the set was the perfect size to give this bunny a fun hat.


These fun images were trimmed and colored for another quick card.  

I kept the "recipe" the same for all the cards and had fun adding "touches of whimsy".

  • The card bases are 3 3/8 x 4 1/2 top-folded white cards.
  • The sentiment strips are 7/8 x 2 3/4-inch pieces of Forest Glen cardstock that were inked with Shabby Shutters Distress and Peeled Paint Distress. 
  • The sentiment is from Salutations.

Clean, simple and fun!!

Thank you for viewing,
Elizabeth


Supplies:
Penny Black Stamps:  Touch of Whimsy 30-073, Salutations 30-014
Penny Black "Mix & Match" Cardstock:  Storm 01-001, Forest Glen 07-001
Tsukineko: Onyx Black VersaFine
Ranger: Shabby Shutters Distress Ink, Peeled Paint Distress Ink, Crystal Stickles, Detail Fine Clear Embossing Powder
Copic Markers

May 20, 2011

Romance of Flowers

On Monday, I featured a decorated envelope using Penny Black’s new transparent set called “Air Mail”.  Today I am combining the same set with their “Romance of Flowers” stickers.


The scalloped border stamp created the perfect frame for this gorgeous sticker.


The “do not bend” stamp was used to create this tiny tag which I then inserted the sentiment “with love” from the same set.

These are the instructions for this card which include details on how the frame and tag were created and a quick method of transforming stickers into dimensional embellishments with cornstarch.


Instructions:
  • Create a 3 7/8 x 4 7/8 top fold card from dark Clear Skies cardstock.  Set aside.
  • Lightly add Vintage Photo ink to a 3 ½ x 4 ½ piece of cream cardstock and ink the edges with gold ink.
  • Mat with a 3 5/8 x 4 5/8 piece of light Fall Festival cardstock.  Paper pierce a border around the perimeter of the cream cardstock.
  • Attach to the front of the prepared card.
  • Wrap a sheer organza ribbon around the bottom of the card and tie in a knot on the front left side.
  • Stamp frame in VersaMark Watermark ink on light Purple Mountain cardstock and heat emboss with white powder.
  • Randomly add Pine Needles and Dusty Concord around the frame for a variegated effect. Trim the frame.
  • Glue the frame to the sticker which has been placed on white cardstock.
  • Attach to the front of the card with dimensional foam tape.
  • Inking only the frame portion of the “do not bend” image, stamp on white cardstock in black and heat emboss with clear powder.  Stamp “with love” inside the tag in black and heat emboss with clear powder.  Add distress inks, trim and attach with dimensional foam.
  • Remove the butterfly sticker and lightly dust the sticky side with cornstarch.  (You can also use baby powder.)  Slightly add bends to the wings.  Attach to the card with a small amount of glue. 
  • Accent the centers of the flowers with Gun Metal Stickles and the scallops of the frame with a Sparkle Gel Pen.

Don't miss visiting the Penny Black Blog for more cards featuring Penny Black stickers created by the design team.  Lots of beautiful inspiration!

I also have two previous posts that use Penny Black stickers here and here.

Thank you for stopping by.

Elizabeth


Supplies:
Penny Black Stamps:  Air Mail 30-072
Penny Black Stickeroos:  Romance of Flowers 10-209
Tsukineko: VersaMark Watermark Ink, Onyx Black VersaFine, Gold Metallic StazOn
Ranger: Pine Needles Distress Ink, Dusty Concord Distress Ink, Vintage Photo Distress Ink, Gun Metal Stickles
Sakura: Sparkle Gelly Roll Pen
3M Scotch: Dimensional Foam Tape
Tombow:  Stamp Runner Permanent Adhesive
White Embossing Powder
Clear Embossing Powder
Sheer Organza Ribbon

May 17, 2011

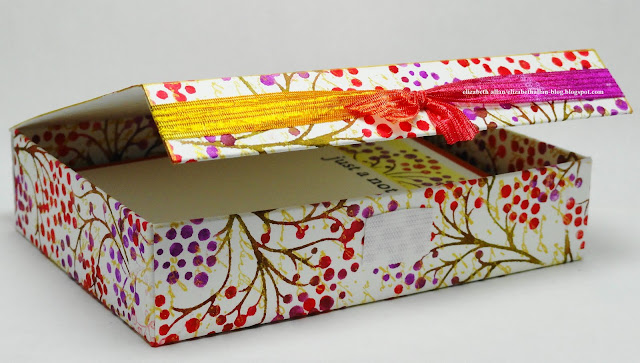
Decorated Stationery Box & Note Cards

For the next three days Penny Black has partnered with Tombow USA for a special blog feature.  

Each day a different artist will reveal their creative inspiration.  Today I am sharing a stationery box with note cards.


Instructions:

Trace the template provide here on watercolor cardstock and cut.  For this sample I used 140 lb. Canson Watercolor Paper.  Apply color directly from the markers (098, 665, 856) to Reverie, mist inked stamp with water, and stamp.   Continue with this process to cover the entire piece.


There is one section of the pattern that will need to be stamped on the reverse side to provide a finished look to the inside edge of the box.  That piece is the long tab that will be folded into the back edge.


Over stamp the design with the Letter Background in gold ink.


Score the fold lines and assemble the box.  Be sure to insert a ribbon, if desired, under the last fold of the box flap before applying adhesive.  This will hide the ribbon and provide an open surface to attach the Tombow Fastener Tab.


After the Fastener Tab has been attached to the top flap, remove the adhesive backing from the remaining portion and then close the lid shut.  This will provide the proper placement of the second piece without adhering the two sections separately.


  • To create the note cards, cut 2 ¾ x 3 ¾-inch pieces of Storm (01-001) cardstock and stamp a shadow block with Tombow Dual Brush Marker 090.  Instructions for creating a custom shadow stamp can be viewed here.
  • Mask off the area around the shadow with Judi Kins Eclipse Tape.  Ink Reverie with the markers (098, 665, 856) and “huff” on the ink.  Stamp over the exposed shadow image.
  • Remove the Eclipse Tape.
  • Stamp the sentiment with black pigment ink and heat emboss with clear powder.
  • Mat the cards with 3 x 4-inch pieces of Penny Black Mix & Match cardstock that have been edged in gold. 
Finished Box Size: 3 3/8 x 4 ¼ x 1
Finished Note Cards: 3 x 4

Thank you for viewing.
Elizabeth

Featured Products: 
Penny Black Mix & Match Cardstock:  Storm 01-001, Fuchsia Fantasies 13-002, Fall Festival 16-003
Tombow Dual Brush Pens: 090, 098, 665, 856

May 16, 2011

Airmail - Decorated Envelope

Today I have a decorated envelope using the new transparent set called “Air Mail” from Penny Black.  It is perfect for creating decorative envelopes to mail your handmade cards! 

Plus, with all the wonderful images, you have endless possibilities of mixing them into card designs.


The framed address block was stamp with black ink omitting the bird in the lower, left corner.  Then the houses and the “to” salutation were added.

A little bit of Summer Sky Memento ink was rubbed in and around the houses and Copics were used for coloring. 

Coloring Tip:  Slide a piece of clean white cardstock into the envelope while coloring to prevent the ink from bleeding through the back of the envelope.  When finished coloring, remove the cardstock.

For the decorative border along the right side, stamp the bar code with black ink letting the “house portion” fall off the side of the envelope. 

For additional inspiration and ideas using Air Mail, stop by the Penny Black Blog today to see all of the design team’s work and join in the reader challenge to decorate an envelope. 

Tomorrow I have a special event to share with you and on Friday I will have a greeting card that combines the new Airmail set with Penny Black stickers.

Have a great day,
Elizabeth  


Supplies:
Penny Black Stamps: Air Mail 30-072
White Envelope
Summer Sky Memento Ink (shading inside address block)
Copic Markers

May 13, 2011

A Wonderful Day With A Hug

Throughout the week I have been using different coloring mediums and today I decided to do a bit of water coloring - and some "fussy" cutting.  


I exchanged the gifts on top of the Gift Sedan with the flowers from Scented Garden and created multiple layers of the car image.  The design on the rose cardstock was made with the little star burst image from the transparent Trims set.  

Instructions:
  • Create a 3 ½ x 4-inch top-fold card from white cardstock.  Stamp the sentiment near the bottom of the front flap with black ink and heat emboss with clear powder.  Set aside.
  • Stamp the star burst around the perimeter of a 3 ½-inch square piece of medium rose cardstock with Rhubarb Stalk ink.  Rub Worn Lipstick over the stamped border.  Adhere to the front of the prepared card with adhesive.
  • Ink a 3-inch square piece of white cardstock with Scattered Straw, Spiced Marmalade and Peeled Paint to create a background.  Mat with black cardstock and attach to the card with dimensional foam.
  • Stamp Gift Sedan three times (omitting the gift portion) with black ink on watercolor paper and heat emboss with clear powder.  This sample uses one full image for the base, the car with the windows removed for the second layer and the two tires for the final layer.
  • Watercolor the images, trim and layer with dimensional foam. 
  • Stamp the flowers from Scented Garden with black ink on watercolor paper and heat emboss with clear powder.  Color, trim and attach to the top of the car.
  • Stamp “hugs” on watercolor paper with black ink and heat emboss with clear powder.  Add watercolors and trim to form a tag.  Attach the tag to the potted flowers with white thread.
  • The layered embellishment is attached to the card with dimensional foam.  Note:  Two layers of foam will be needed under the flowers so it will be at the same dimensional level as the car.
  • Accent flowers with stickles and the head/tail lights with Glossy Accents.

Thank you for stopping by.

Wishing everyone a wonderful day and weekend,
Elizabeth


Supplies:
Penny Black “Mix & Match” Cardstock:  Storm 01-001, 01-003; Rose Garden 14-002
Canson:  Watercolor Paper
Tsukineko: Onyx Black VersaFine, Rhubarb Stalk Memento
Tombow: Dual Brush Pens, Stamp Runner Permanent Adhesive
Ranger: Scattered Straw, Spiced Marmalade, Peeled Paint, Worn Lipstick; Crystal Stickles, Glossy Accents, Detail Fine Embossing Powder
3M Scotch:  Dimensional Foam Tape

May 11, 2011

Antique Flowers

Today I am using Staedtler Ergosoft Colored Pencils for my coloring medium.  The triangular structure makes holding these pencils very comfortable and the lead is creamy and easy to blend.


All stamps by Penny Black


Included in the instructions below are the inks and techniques used to makes these patterned backgrounds.


This is the mask that was used to protect the image while the background was distressed and stamped.  It was made from Eclipse Tape by JudiKins.  It is like having a giant "sticky note" and enables me to create repositionable masks in various sizes.


Card Instructions:
  • Create a 3 ¾ x 4 ¾ top-fold card from cream cardstock.  Ink the edges with Antique Linen and paper pierce around the perimeter.
  • Stamp Majestic Composition on a 1 ½ x 4 ¾-inch piece of light Spring Meadow cardstock with Spanish Moss ink.  Distress with Antique Linen, Vintage Photo, Walnut Stain and Spiced Marmalade.  Re-ink and stamp the background a second time in Spanish Moss over the inks.  Spray with Gold Sheer Shimmer Spritz.
  • Mat the right-hand edge with black cardstock and adhere to the front of the card.
  • Stamp Pin-Striped on a 3 ¼ x 3 ¾-inch piece of white cardstock.  Trim the width down to 2 ¾ inches allowing the petals to overhand the edges.
  • Color with Staedtler Ergosoft Pencils.  Use the white pencil to help blend the colors as well as a dry blending stump.
  • Stamp Pin-Striped on Eclipse Tape and trim to create a mask.  (See photo above)  Place over the colored image.
  • Distress the edges with Antique Linen, Vintage Photo and Walnut Stain inks.
  • Stamp Letter Background with Vintage Photo ink.  Remove the mask.
  • Mat with light Grand Canyon and Black cardstocks. 
  • Attach the matted artwork to the front of the card with dimensional foam.
  • Accent the stamens with a white gel pen and crystal stickles.


Button Embellishment:
  • Stamp Cute as a Button on white cardstock with black ink and heat emboss with clear powder.
  • Color button with a light tan pencil and add copper and ruby metallic rub-ons.
  • Pierce holes and coat with Sepia Accents.
  • When dry, lightly add Stone Grey StazOn to mute the shine and add thread through the holes.
  • Attach with glue dots.

Today I would like to send hugs to Cathy Fong and Virginia Lu for their continuous RAK's (Random Acts of Kindness).  They are extremely talented women who generously share their inspiration and highlight fellow artists.  Thank you Cathy and Virginia!!

More special thanks to friends and readers who visit my blog.  I appreciate the time that you spend with me and your thoughtful comments!

With appreciation,
Elizabeth 

Supplies:
Penny Black “Mix & Match” Cardstock:  Sticks & Stones 01-003, Grand Canyon 03-001, Fern Green 05-001
Tsukineko: Onyx Black VersaFine, Gold Sheer Shimmer Spritz, Stone Grey StazOn, Jumbo Daubers
Ranger:  Antique Linen, Vintage Photo, Walnut Stain, Spiced Marmalade, Crystal Stickles, Sepia Accents
3M Scotch:  Dimensional Foam Tape
Tombow: Stamp Runner Permanent Adhesive
Sakura: White Gel Pen
Craf-T Products:  Metallic Rub-Ons

May 9, 2011

Friendship

Frogs and snails and puppy dog tails - that's what little boys are made of.....


Finished Size:  4" Square

All of the stamps used for this card are from Penny Black's new Touch of Whimsy catalog.  

I “borrowed” the soccer ball from the hedgie stamp called “Game On” to add to this cute boy and his best friend.  To transform the ball from whimsical to well-loved, I scuffed it with Antique Linen ink.

I love the versatility of breaking sentiments up when stamping.  It allows me to use the remaining portion on the inside of the card or mix and match with other phrases.  Here a portion of the Friendship sentiment was used along with the Zen background on Mix & Match cardstocks.  To soften the pieces, I distressed them with inks. 

The stitching was added with a black pen and there is dimensional foam between the base of the card and matted cardstocks and under the boy and ball.

Thank you for visiting,
Elizabeth

Penny Black “Mix & Match” Cardstock:  Storm 01-001, Fern Green 05-003, Clear Skies 10-003
Tsukineko:  Onyx Black VersaFine, Spanish Moss VersaFine, Jumbo Sponge Daubers
Ranger:  Antique Linen, Vintage Photo, Walnut Stain, Mustard Seed, Detail Fine Embossing Powder
Copic Markers
3M Scotch:  Dimensional Foam
Sakura:  Black Micron Pen