October 31, 2011

The Bare Bones

This 2-inch square miniature was a personal challenge.  I couldn’t resist the temptation of “fussy” cutting the skeleton inside the small window. 


I love the contrast of white and black and used them for my artwork and mat layers.  I threw in a little gray for shading and a pop of color with the candy corn.

All these fun, spooky images are part Penny Black’s “Halloween Treats”.  

The sentiment included in the set is curved, but I straightened it into a horizontal phrase to fit the card design.  To make the alteration, I applied temporary adhesive to my acrylic block.  When I applied the sentiment over the adhesive I twisted it slightly so it would be positioned linear.

A miniature “bare bones” card!

For more Halloween delight, have fun checking out CardMaker's special holiday post "here" (beginning at 8 am EST).

Happy Halloween,
Eliza-boo!

Supplies:
Penny Black Stamps: Halloween Treats 30-078
Penny Black Mix & Match Cardstock: Storm 01-003
Copic Markers
Tsukineko: Onyx Black VersaFine, Clear Embossing Powder
3M Scotch: Dimensional Foam Tape 

October 28, 2011

Coloring WITHOUT Markers, Pencils or Crayons


This card was colored with Ranger Distress Inks applied with Cut ‘n Dry Foam. 


The flower was stamped on glossy cardstock with black pigment ink and heat embossed with clear powder.  You can see the “photographic” appearance this type of paper provides.   After the distress inks were applied it was trimmed and attached to the front of the card with dimensional foam.    


For the card base, two labels were die-cut from white cardstock and elevated on the front of a small blue card.  Before assembling, the top label was left inside the die to create a mask while Vintage Photo Distress ink was applied.

A fun way to create a batch of colorful blossoms!

Have a wonderful weekend,
Elizabeth

Supplies:
Penny Black Stamps: Cheerful 4160K, Salutations 30-014
Penny Black Mix & Match Cardstock: Blue Skies 10-003
3M Scotch: Dimensional Foam Tape
Glossy Cardstock
Ranger: Vintage Photo, Spiced Marmalade, Fired Brick, Shabby Shutters Distress Inks; Cut ‘n Dry Foam
Tsukineko: Onyx Black VersaFine, Clear Embossing Powder
    

October 26, 2011

Thinking of You - A "Sketch" Card

This week the Penny Black designers are working with this card sketch by Jenyfur:


For my interpretation, I elevated a paper pierced rectangle tied with a ribbon on a tan card base distressed with Vintage Photo.


The smaller squares were all distressed with Vintage Photo before being attached to the card with dimensional foam.  The pines were “fussy” cut and had a second pine cone added for dimension.  The bows are from a present that is part of the same Christmas Treasures transparent set.

You can see more inspiring designs using this sketch all this week on the Penny Black Blog.  

Thank you for visiting and have a great day!
Elizabeth 


Supplies:
Penny Black Mix & Match Cardstock: Sticks & Stones 02-002
Copic Markers
Offray: Brown Grosgrain Ribbon
Ranger: Vintage Photo Distress Ink
Tsukineko: Onyx Black VersaFine, Clear Embossing Powder, Sponge Dauber

October 24, 2011

Merry Everything Mim

I am looking forward to "swinging" into the upcoming holidays with this delightful elf called Mim.


Layers of Reverse Wonky Rectangles set the stage for Mim and her merry everything ornament.    


The outer frame was die cut from red cardstock and a subtle pattern was created by stamping snowflakes in crimson red and black.  To soften the contrast of the black ink, the first impression was made on scrap paper and the lighter, second impression was applied to the frame. Touches of gold ink edging and random white gel pen dots finished the embellishing before it was elevated on the front of the prepared card base. 

The elevated interior rectangle was highlighted with thatched straw ink then the Retro Pattern was stamped in Delicata Golden Glitz.


Little Mim was stamped on white cardstock with black ink and heat embossed with clear powder.  Before coloring, the sentiment was stamped inside the ornament and heat embossed with clear powder.

After “fussy” cutting the image, two layers of 1/8 inch dimensional foam were stacked to create a ¼ inch elevation.  This helped pop the image up and above the red frame.

TIPS/HINTS:
1)   To create the card base, die-cut two rectangles from white cardstock.  Score one rectangle 1 inch from the top edge.  Apply adhesive to the scored tab and attach the second rectangle on top. 
2)  Plan the placement of dimensional foam to the outer frame to leave a portion unobstructed at the top so the black string from the ornament can be wrapped around and tied in a bow.
3)  If the coloring medium has soaked through the image and is visible from the backside, color the overhanging elements (hat and pompom) with a Black PITT Artist Pen.  This pen will not soak through to the front and will give the card a finished appearance when viewed from the back.


Thank you for all your visits and comments.  They make each and every day merry!

Smiles,
Elizabeth

Supplies:
Penny Black Mix & Match Cardstock: Rose Garden 14-003
Copic Markers
Faber-Castell: Black PITT Artist Pen
Tsukineko: Onyx Black VersaFine, Crimson Red VersaFine, Thatched Straw VersaMagic, Delicata Golden Glitz, Clear Embossing Powder, Sponge Dauber
Sakura: White Gel Pen
Spellbinders: Reverse Wonky Rectangles S4-307
Other: Black String, Dimensional Foam (3M Scotch / EK Success)

October 21, 2011

Halloween Monster Magnet

Today’s post is dedicated to my younger sister who loves the scary and edgier side of Halloween.  

I made this magnet for her so she could add some spookiness to her refrigerator as she decorates for the holiday.


I knew I had to come up with something uniquely strange to surprise her, so I used Tim Burton’s quirky characters from Nightmare Before Christmas as inspiration.

You may have noticed that Miles from Mimi’s Halloween has had a spell cast on him with the pumpkin and cupcake wrapper from Halloween Treats.

Thanks for joining me for a bit of silliness,

Elizabeth

Supplies:
Copic Markers
Tsukineko: Onyx Black VersaFine, Clear Embossing Powder
3M Scotch: Dimensional Foam Tape
Magnet

October 19, 2011

Holiday Tag & Ornament

With the holidays right around the corner, I have been setting aside gift tags.

I thought these would be fun gift adornments that could be transferred to the tree after the present had been opened.


Two die-cut circles mounted together with dimensional foam create the base of the tag.  From the front you can see the Fern Green die-cut circle was stamped with snowflakes and heat embossed in white.   


The circular sentiment was stamped twice on white cardstock – once in red and a second time in black.  Both images were heat embossed with clear powder.  The black image was trimmed and distressed with Antique Linen before being layered with foam on top of the “fussy” cut red image.  The “gift” embellishment was created by stamping the present on white cardstock with Spanish Moss ink.   Lime green stickles were used for accenting as well as a red PITT pen.


The backside of the tag is a white cardstock die-cut edged with Delicata Golden Glitz ink and stamped with “to” and “from” which are a part of the transparent Airmail set.  For wool mittens, two sets of the mittens were stamped in red and heat embossed with clear powder.  Each mitten was painted with Duo Embellishing Adhesive.  After the adhesive dried, leaving a tacky surface, red crushed velvet flock was applied.

You can see more gift tag inspiration all this week on the Penny Black Blog as well as some of my past favorites "here".

These are also are great for cards!

Elizabeth

Supplies:
Penny Black Mix & Match Cardstock:  Forest Glen 07-003
3M Scotch: Dimensional Foam Tape
Doodlebug Designs: Red Crushed Velvet Flock
Faber-Castell: Deep Scarlet Red (#219) PITT Artist Pen
Ranger: Antique Linen Distress Ink, Lime Green Stickles
Spellbinders: Standard Circle Nestabilities
Tsukineko: Onyx Black VersaFine, Crimson Red VersaFine, Spanish Moss VersaFine, White VersaColor, Delicata Golden Glitz, Clear Embossing Powder, White Embossing Powder, Sponge Dauber
USArtQuest: Duo Embellishing Adhesive
Other: Black String

October 17, 2011

Home Sweet Home (Part II)

While working with the new Victorian Homes my eye spied the cutest little birdhouse hidden in one of the images…..


These little dormer windows seen in this card here were fastened to florist wire for a row of cheerful color.


The mesh background stamped in Mango Madness added a bit of sunny reflection and the grass was leftover from the projects I made here.  I always keep little stamped bits and pieces in a small tin.  What happens to be a leftover at one time becomes just the right embellishment for a card at another time. 


For accents, the windows were adorned with Glossy Accents and a small flower brad was placed in the upper right corner.  I trimmed the arms off of the brad with wire cutters and attached the “head” with dimensional foam.  I purposely attached it “kittywampus” for added dimension and whimsy.

Sharing a smile with all of you,
Elizabeth

Penny Black Mix & Match Cardstock: Storm 01-003, Sticks and Stones 02-002
Copic Markers
Tsukineko: Onyx Black VersaFine, Mango Madness VersaMagic, Clear Embossing Powder
Making Memories: Small Flower Brad
Ranger: Glossy Accents     

October 14, 2011

Home Sweet Home

Today I am stamping with a new set from Penny Black called Victorian Homes.


The set includes two cozy homes that are fast to color and can be used for a multitude of greetings – new home, thinking of you, invitations, birthdays…  Endless possibilities!  I am leaving this one blank for the time being and will personalize the inside later.

    
I kept the dimension simple and popped the dormers.  All the windows were accented with Glossy Accents.


I also had fun doing some landscaping and drew some bushes to plant around the house.  The background was a quick touch of Tumbled Glass and Mustard Seed Distress inks.

If you like this stamp, please stop by again on Monday when I will be posting a card using this image in an entirely different way!

Happy Friday,
Elizabeth

Supplies:
Penny Black Stamps: Victorian Homes 40-091
Penny Black Mix & Match Cardstock: Sticks & Stones 02-002
3M Scotch: Dimensional Foam Tape
EK Success: 3D Dots
Copic Markers
Ranger: Mustard Seed Distress Ink, Tumbled Glass Distress Ink, Glossy Accents
Tsukineko: Onyx Black VersaFine, Clear Embossing Powder

October 12, 2011

A Pocket Full of Joy

Happy Wednesday!

Today I have a pocket card made with Penny Black’s new stickers “Christmas at Dusk”.


The top, created from two banner flag stickers, slides up to reveal a holiday greeting.


After creating the pocket portion of the card, I used a second sheet of stickers to create the dimensional ornaments.


I experimented with a few different colors of Stickles and decided that the Golden Rod worked the best over the black bows and tied in nicely with the gold ribbon wrapped around the top of the slider.


The small accents in the sentiment were colored with a red PITT Artist Pen.  These pens are known for their non-bleeding properties and will not soak through the paper and show on the reverse side.

My favorite way to work with stickers that gives me the most flexibility is to mount them to cardstock.  This adds thickness to the sticker, trimming and cutting are easier, pieces can be bended, and elements can be “dry” fit/positioned during a project.

You can see more cards featuring Penny Black stickers that I created here and by the Penny Black designers this week here

Have a fabulous day,

Elizabeth

Supplies:
Penny Black Stamps: Winter Wonders 30-087
Penny Black Stickers: Christmas At Dusk 10-212
Tsukineko: Onyx Black VersaFine, Delicata Golden Glitz, Clear Embossing Powder
Faber-Castell: #219 Deep Scarlet Red PITT Artist Pen
Ranger: Golden Rod Stickles
3M Scotch: Dimensional Foam
Offray: Gold Ribbon

October 10, 2011

Candy Corn Goodies

In a way I think candy corn gets a bad rap.  It is bright and pretty, but most people don’t tend to choose it as their first pick when indulging in a Halloween treat.

I think I have something that might turn those tables.


I was chuckling as I made these treat bags with the little chicken “witching” a Happy Halloween and sharing some “corn”.

If you like Pay Day candy bars you’ll love this two-ingredient recipe:

Candy Corn + Dry Roasted Peanuts.  Trust me, after one bite you’ll be addicted!


To top the treat bags, a black tent card was folded over the top and two holes were punched through all the layers.  Decorative ribbon was threaded through and knotted on the back with two spider rings.  Everyone needs some spider bling right?


The bags were then turned over and the elevated artwork was positioned on the front.  This allows the recipient to reseal the package and save the topper after the treat is gobbled up.

Enjoy,
Elizabeth

Supplies:
Copic Markers
Tsukineko: Onyx Black VersaFine, Clear Embossing Powder
3M Scotch: Dimensional Foam
Offray: Ribbon

October 7, 2011

Stamping on Glass

Today I have a few home décor projects that I created by stamping on plain glass containers.   

This first one is a votive candle holder.
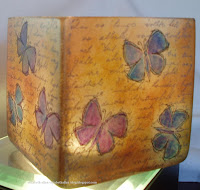


(Votive on a lighted stand)


Instructions:

Apply a layer of Platinum Metallic StazOn directly from the pad to the outside of the glass votive container.  Let dry and repeat with a second layer of Platinum.   When dry, add a layer of Silver Metallic StazOn.

Randomly stamp the butterfly with Jet Black StazOn on all sides of the votive.  Using Fantastix, pull color from the Ultramarine and Royal Purple StazOn pads and color the butterflies.  Hint:  StazOn cleaner used sparingly on a Fantastix can help blend color.

Create “masks” for the butterflies from Eclipse Tape and position over the stamped images.  Using a combination of small and jumbo daubers, pounce Gold and Copper Metallic StazOn around the masked butterflies.  Let dry.

Leaving the masks in place, stamp letter background on all four sides of the votive with Silver Metallic StazOn.  Remove masks and let dry.

Clean stamps with StazOn cleaner.


This glass vase has what I like to refer to as “faux” glass etching.


Instructions:

Mask off any area that is not going to be “etched”.  In this project, the top and bottom portions of the vase were masked off exposing a band of glass around the center.

Apply three layers of Platinum Metallic StazOn ink directly from the pad to the exposed band of glass.  Let each application dry before adding additional layers. 

When dry, stamp the decorative flourish on top of the inked band with Copper Metallic StazOn.  Let dry.

Remove the protective tape.

Clean the stamp with StazOn cleaner.


Here is a peek at another piece using the same “faux” etching technique.    

Published in Scrap & Stamp Arts October 2011 (Page 35).

These glass pieces also make wonderful candy dishes or elegant desktop accessories.

If you are inspired to try stamping on glass, be sure to use inks formulated for non-porous surfaces so they dry properly.  Also, inked stamps have a tendency to “glide” on glossy surfaces so slow and even pressure when creating the impression is helpful to obtain a crisp image.

Please feel free to contact me at elizabeth.a.allan@gmail.com if you have questions regarding any posted projects or materials.  I will happily respond to all inquiries.

Have a wonderful day,

Elizabeth


Butterfly Votive Supplies:
Glass Votive: 3” Square
Judi Kins: Eclipse Tape
Tsukineko: Gold Metallic StazOn Kit, Silver Metallic StazOn Kit, Copper Metallic StazOn Kit, Platinum Metallic StazOn Kit, Ultramarine StazOn, Royal Purple StazOn,  Jet Black StazOn, Fantastix, Sponge Dauber, Jumbo Dauber, StazOn All Purpose Stamp Cleaner

Faux Etched Vase Supplies:
Penny Black Stamps: Footnote 3857H
Rectangle Glass Vase
Judi Kins: Eclipse Tape
Tsukineko:  Copper Metallic StazOn, Platinum Metallic StazOn, StazOn Stamp Cleaner

October 5, 2011

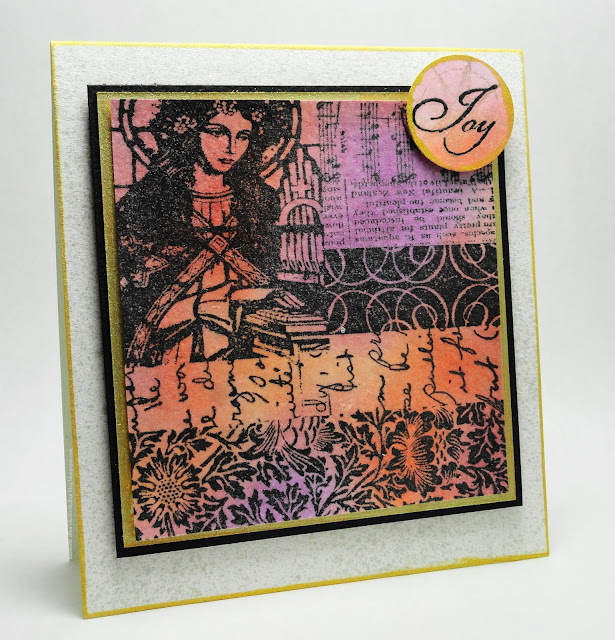
Eternal Joy

I am very excited about this week’s “collage” challenge theme on the Penny Black Blog.  Their fabulously intricate stamp designs allow you to create stunning cards with a single impression. 


Brilliance Pearlescent inks were randomly applied to white cardstock before the image was stamped in black. 


A larger section beyond what was needed for the main image was also inked to provide an area to stamp the small star burst and die-cut it into a circle for the sentiment embellishment. 


After trimming the design, it was sprayed with GooseBumps Clear Texture Spray for a “glass” effect.

The card based was sprayed with Pewter Sheer Shimmer Spritz and a few of the layers were edged in Delicata Golden Glitz before the elements were attached with dimensional foam.

You can view a sampling of other designs I created using Penny Black’s collage stamps here, here, here and here.

Thank you for sharing your time with me!

Elizabeth


Supplies:
Penny Black Mix & Match Cardstock: Storm 01-003
Tsukineko: Tuxedo Black Memento Ink, Brilliance Pearlescent Orange, Brilliance Pearlescent Yellow, Brilliance Pearlescent Orchid, Delicata Golden Glitz, GooseBumps Clear Texture Spray, Pewter Sheer Shimmer Spritz
Spellbinders: Standard Circle Nestabilities
3M Scotch:  Dimensional Foam Tape

October 3, 2011

A Spooky Boo!

I should warn you that today’s post may be a bit scary.

As you look at this card, you are probably thinking that the bat looks innocent enough flying over the haunted house. 


And then ----


Be honest, didn’t this scare you just a teeny tiny bit?


I tucked a small sliding mechanism behind the tree for an interactive pull-out.  After making a small slit on the side of the tree, an elongated tag was inserted. 


From the reverse side you can see where a “stopping gate” was attached.  These are handy to incorporate so the slider will remain in the slot.  Be sure to keep adhesives away from the sliding area when matting so they will not obstruct the device from moving.


To give the bat a shiny finish, I applied GooseBumps Clear Texture Spray.


Here you can see how the cardstock was distressed with different inks and then sprayed with Gold Sheer Shimmer Spritz before the border pattern was stamped.

Today I would like to extend a special thank you to CardMaker Magazine for inviting me to be a part of their “Meet the Designer” series.  It is an honor and privilege to be selected to share my artwork with this fabulous publication.  They will also be sharing a few sneak peeks of the article with on-line viewers.  You can pop in “here” to check it out!

Thank you for visiting,
Elizabeth 

Supplies:
Penny Black Mix & Match Cardstock: Summer Sun 17-003, Storm 01-003
Copic Markers
Tsukineko: Onyx Black VersaFine, Clear Embossing Powder, Persimmon VersaMagic, Pumpkin Spice VersaMagic, Gingerbread VersaMagic, Cantaloupe Memento, Gold Sheer Shimmer Spritz, GooseBumps Clear Texture Spray
Ranger: Weather Wood Distress, Dusty Concord, Crystal Stickles
Offray: Orange Boxstitch 1/8” Ribbon