July 30, 2012

Stamp and Go!

Create this card in 15 minutes or less!


Here’s how:
  • Stamp the dots (Pointille) on a 2 3/8 x 3 ¼-inch piece of white cardstock in Wheat VersaMagic.
  • Ink the flower (Allegro) with Orchid Pink and Bamboo VersaColors and stamp over the dots.
  • Stamp the sentiment (So Blessed) in Onyx Black VersaFine.
  • Edge the piece with a Delicata Golden Glitz ink pad.
  • Mat with a 2 ½ x 3 3/8-inch piece of white cardstock.
  • Punch a hole in the middle of the flower and insert a silver brad that was tinted with Cherry Pink StazOn.
  • Tape ribbon loops to the back of the design and mount to 3 3/8 x 4 ¾-inch top-folded card base with dimensional tape.  (Design Option: Dry emboss the lower half of the card base with dots.)

TIP/HINT:  Tinting the brad at the beginning the project will give it time to dry so it will be ready to use when accenting the flower later in the project.  

Have a great day!

Elizabeth 

Supplies:
Penny Black Mix & Match Cardstock: Storm 01-001
American Crafts: Ribbon
Imagine Crafts/Tsukineko: Onyx Black VersaFine, Orchid Pink VersaColor, Bamboo VersaColor, Wheat VersaMagic, Delicata Golden Glitz, Cherry Pink StazOn
Making Memories: Silver Brad
Provo Craft: Cuttlebug Swiss Dots Embossing Folder

July 27, 2012

A Flash Friday Tip

Isn’t funny how those indiscernible little pieces of lint or fuzz show up AFTER you make your stamp impression?!

When you come across these invisible challenges an easy way to quickly remove them is with a simple tape loop.


A couple of taps across the stamp will pick up any tiny particles that may be clinging to the rubber design.  

Tip Variation:  My sister uses the same idea but with a small lint roller.

Happy Friday,
Elizabeth 

July 25, 2012

An Invitation

Whether you are hosting a casual outdoor BBQ or an elegant dinner party, these events always start with the same thing ---- an invitation!

Here’s a fun way to invite family and friends to your special gathering.


Published in Scrap & Stamp Arts, June 2012.  Detailed instructions are available on pages 32-33.

This invite was created with Penny Black’s “Victorian Homes” illustrated by Mo Manning. 


Inside Text

Tip/Hint:  Adding extra spacing between sets of computer generated text printed on white cardstock makes for easy aligning and trimming with a Spellbinders die.

Design Variations:  Alter the text on the inside of the card for a congratulatory new home greeting or for change-of-address cards.

Have a fabulous day,
Elizabeth

July 23, 2012

CHA Highlights

The 2012 Summer CHA Convention proved, yet again, to be another spectacular show!  The convention center was filled with fabulous exhibitors, colorful art and the friendliest retailers/artists/attendees!

Here is a peek of the Penny Black booth:


The 8 by 20 foot wall showcased all the new stamps along with card samples.  There are 15 new Halloween designs, 54 new Christmas/Holiday designs, 1 new sticker collection and the debut premiere of two new products!!  (More about all this wonderfully exciting news in upcoming posts.)

Penny Black’s make-n-takes were offered at a long rectangular table that was positioned toward the back of the booth and I am looking forward to sharing those projects with you soon!

Many, many thanks to all of you who sent me off on my travels with good wishes and to those who visited the booth and shared a hug!  Your kindness, support and enthusiasm made this event extra special.

Elizabeth

July 16, 2012

Traveling to CHA

A Happy Hello!

I will be away from my blog for a bit as I travel to Chicago to attend the CHA 2012 Summer Convention with Penny Black.

This is a sneak peek of what I am packing to take with me for my make-n-takes…..


When I return I am excited that I will be able to reveal the completed projects as well as the new Penny Black Halloween and Christmas stamp images!

See you soon,
Elizabeth

July 13, 2012

A Flash Friday Tip

Paper Tak (poster putty) makes wonderful repositionable platforms. 


A little bit of this putty can be rolled into a ball and placed on top of a small jar.


Then the image to be embellished can be placed on top.

I find this very helpful when I am using glue to add fine details to pieces.  This slight elevation allows me to work on the edges and not worry about the piece becoming attached and/or glued to the work surface.

After the embellishing is completed, it is easy to move the jar with the attachment to another area to dry thereby eliminating the chances of smudging the piece as it is transferred.  When the piece is dry, it can simply be removed from the Paper Tak and the putty can be saved for another project.

It is also great for temporarily securing items when working on cord or string attachments!

Happy Friday,
Elizabeth 

July 11, 2012

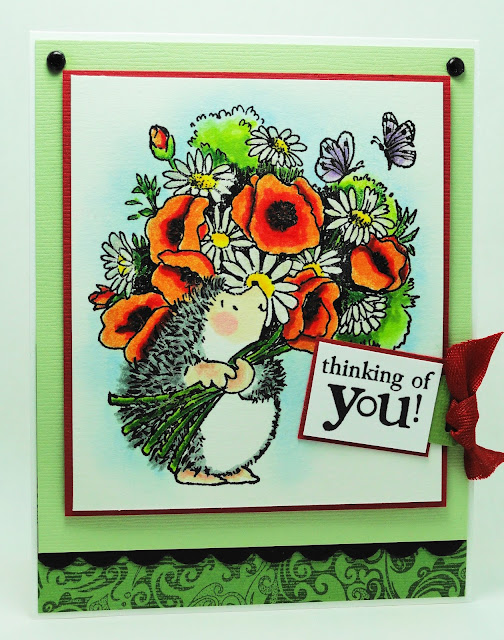
Summer or Holiday Color Combo

A quick share today.

As I was looking through some of my past artwork, I came across this card.


So often I think of a red and green combination as a Christmas duo, but I remember how excited I was with how the fresh green and deep red matched so nicely with the poppy bouquet.

As you are working on your holiday cards, don’t set those red and green bits and pieces too far as you may want to reach for them again in the spring or sneak a few in right now!!

Elizabeth

Imagine Crafts/Tsukineko: Onyx Black VersaFine, Olympia Green VersaFine, Clear Embossing Powder
Stamped image was watercolored.

July 9, 2012

Creating Laser Cuts from Stamps


When I saw the components that made up the border in Lace Delight, I was inspired to create “laser cut” edging.


One impression of the border on white cardstock in Onyx Black VersaFine heat embossed with clear powder was all that I needed for the elements.  Segmented portions of the design were colored with Copics BG 13 and 15.  After fussy cutting the outline, a craft knife was used for the ovals and a tiny hole punch for the circles.

Tangelo Memento ink was the perfect match for the Paisley Swirls stamped on Summer Sun cardstock.

Dry embossed vertical lines were positioned at the bottom of a 3 x 4 ¾ top-folded card before the decorative piece was attached with dimensional foam. 

I also found that Turquoise Gem VersaMagic for the sentiment matched the colors of the Copic markers.

Here is a second version which has de-embossed dots added to the top.


Thank you for sharing your time and "blog hugs" with me …. they are enjoyed immensely!

Elizabeth

Supplies:
Penny Black Mix & Match Cardstock: Storm 01-001, Summer Sun 17-003
Copic Markers: BG 13, 15
Darice: Crystal Gems
Dimensional Foam
Imagine Crafts (Tsukineko): Onyx Black VersaFine, Tangelo Memento, Turquoise Gem VersaMagic, Clear Embossing Powder
Provo Craft: Cuttlebug - Just My Type Embossing Folders (37-1170)
Other: Scoring Tool, Craft Knife, Small Hole Punch, Heat Tool


July 6, 2012

"Artist In Residence" Announcement

I am very excited to share with you that I have been invited to join the Imagine Crafts/Tsukineko "Artist in Residence" (AIR) Design Team!

The added bonus is that I will be able to combine this new adventure with being a Penny Black Design Team Member!

Each month "AIR" artists will be submitting all types of projects which will be showcased on Imagine Crafts/Tsukineko's Blog and Facebook page with access to free downloadable instruction sheets!  Their fabulous inks and products add such colorful beauty to an artist's creativity and imagination.

Here is one of my first projects - an Americana Towel. 

To print the project sheet, click "here".

To meet the "AIR" design team members and view other downloadable project sheets, please visit Imagine Crafts' Facebook page "here".

I am looking forward to sharing more "AIR" projects with you soon!

Elizabeth

Supplies:
Penny Black Stamps: Puzzle Parts 30-114
Tsukineko:  Poppy Red VersaCraft (VK-114), Ultramarine VersaCraft (VK-118)


July 4, 2012

Fourth of July Twinchie

Celebrating the Fourth of July with a “twinchie”!


This little card created from a portion of Spellbinders Labels Twenty-Two
 measures just 2 inches square.


The little cat from Penny Black's “What’s Cooking?” is surrounded by a festive burst of blended Dandelion, Cantaloupe, Tangelo and Lady Bug Memento inks.

Wishing you a bright and sparkly holiday filled with family, friends and freedom!

Elizabeth

Supplies:
Penny Black Stamps: What's Cooking? (30-100)
Penny Black Mix & Match Cardstock: Fern Green 05-001
Copic Markers
Spellbinders: Labels Twenty-Two
Tsukineko: Onyx Black VersaFine, Dandelion Memento, Cantaloupe Memento, Tangelo Memento, Lady Bug Memento, Sponge Daubers, Clear Embossing Powder
Other: Red Glitter


July 2, 2012

Chocolate Box

Hello and Happy Monday!

To start the week, I am hosting the Penny Black blog with this decorative candy box.


I created my own box template so the finished design would measure 1 ¼ inches square and stand 2 inches tall. 

The template was drawn on Blue Lagoon cardstock and stamped with Flower Flourish in Teal Zeal Memento ink.  


Here you can see the stamped piece with the addition of an acetate window.


For added glimmer, the entire piece was sprayed with Frost Sheer Shimmer Spritz.


The medallion on top is fashioned from layers of one segment of the Puzzle Parts border.

Tip/Hint:  Create additional design variations for dimensional elements by slightly offsetting the pattern when layering the components.  In this sample, the second and third layers were turned 90 degrees.


To finish the project….. just fill with yummy goodies!

Thank you for visiting.

Have a sweet day, 
Elizabeth  

Supplies:
Penny Black Mix & Match Cardstock: Storm 01-001, Blue Lagoon 09-002
Tsukineko: Teal Zeal Memento Ink, Frost Sheer Shimmer Spritz
Other: Acetate, Crystal Gem, Dimensional Foam