March 1, 2013

A "Splash" of Abstract

One of the things that I enjoy about coloring is that I do not necessarily have to stay within the lines.


Abstract Painting
These small abstract pieces of art were created by randomly painting small swatches of Dr. Ph Martin's HYDRUS Watercolors on heavy-weight watercolor paper.  These watercolors have fantastic vibrancy!


DSC04405
After the watercolors had completely dried, the images 
were then stamped in Onyx Black VersaFine ink.


DSC04399
This gorgeous bird silhouette is from 
Penny Black's Tweet Tweet transparent set.


DSC04404
The same concept was used for this card with the addition 
of the artwork having torn edges and a sentiment from
 Penny Black's Nature's Wishes.


DSC04401
These blossoms (Penny Black's Blooming Garden) were accented with USArtQuest's Interference Gold 
Pigmented Mica Watercolor Paint and tiny white seed beads.


Wishing you a day "swooshed" full of color,
Elizabeth

Supplies:
Penny Black Stamps: Blooming Garden 30-155, Tweet Tweet 30-156, Nature's Wishes 30-109
Penny Black Mix & Match Cardstock:  Storm 01-001
Canson: 140 lb Watercolor Paper
Dr. Ph Martin's Hydrus Watercolors
Imagine Crafts/Tsukineko: Onyx Black VersaFine
USArtQuest: Jewelz Watercolor Palette / Interference Gold


For questions and/or comments, please feel free to e-mail me at:  elizabeth.a.allan@gmail.com

February 27, 2013

Road Trip

I am thrilled to announce that during the next several weeks I will be sprinkling in posts of projects that I created as a 2012 AIR designer for Imagine Crafts/Tsukineko.  It was an exciting adventure working with them, their talented group of co-artists and their amazing and colorful products!  

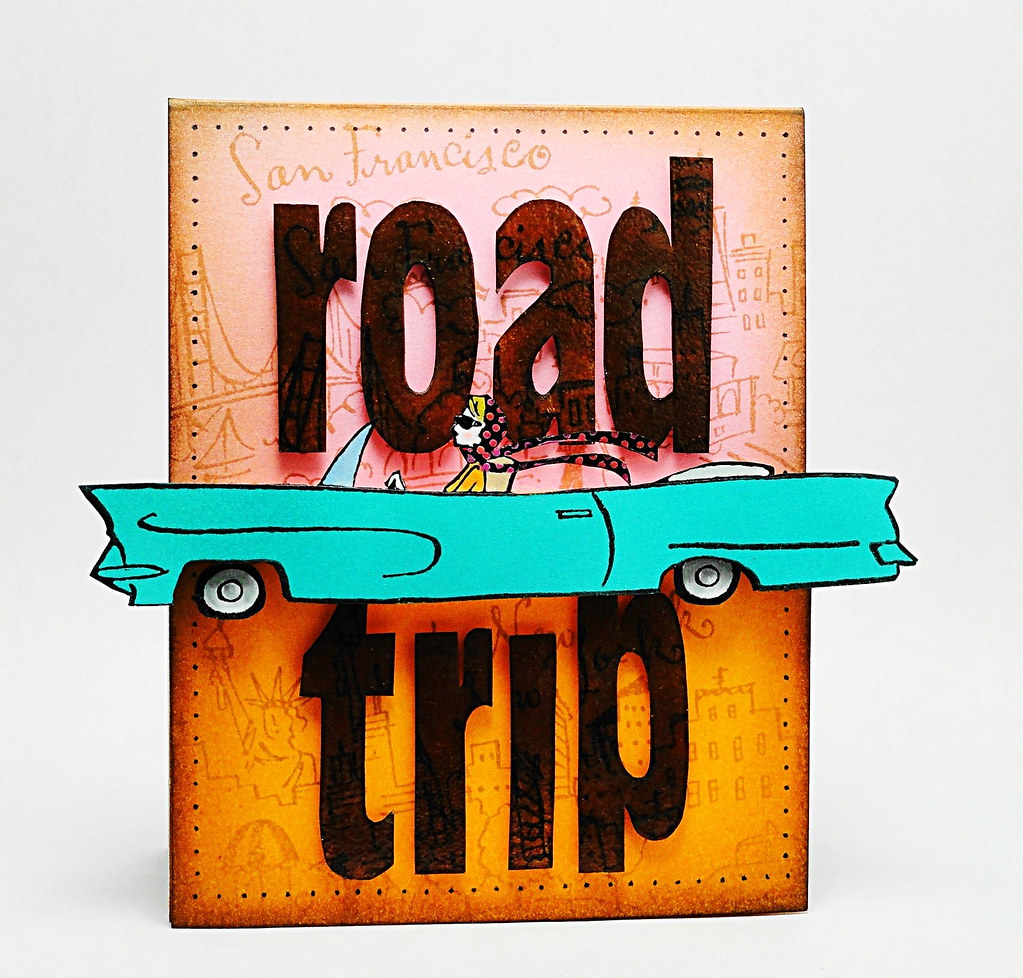
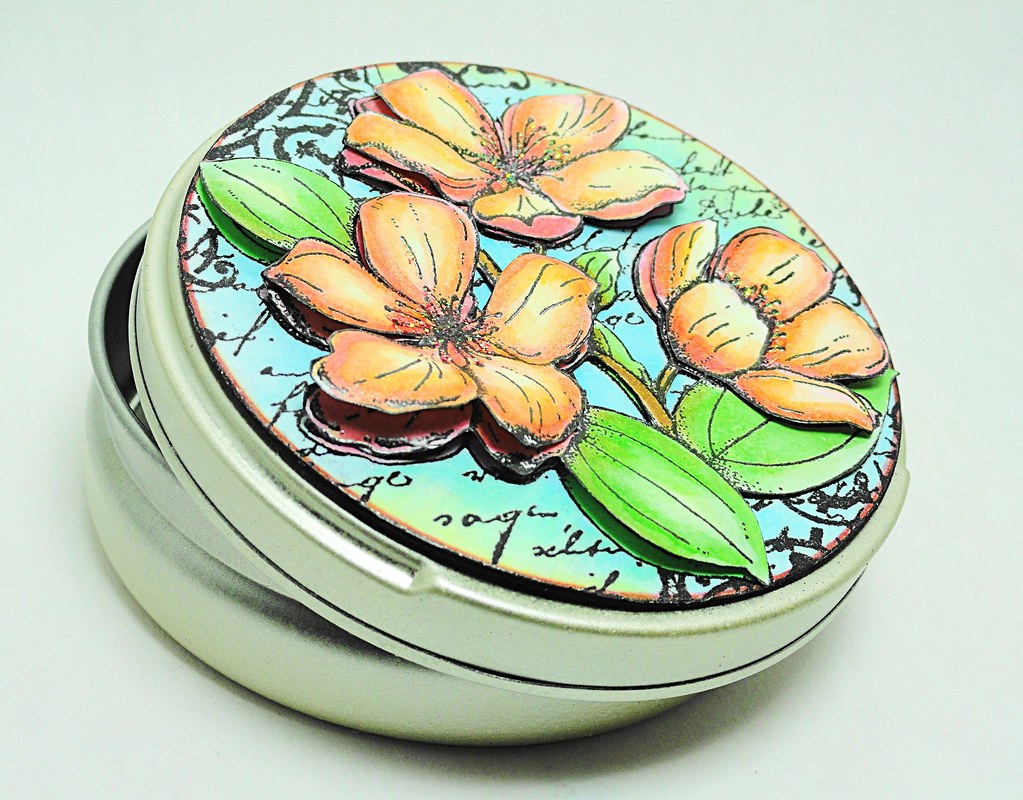
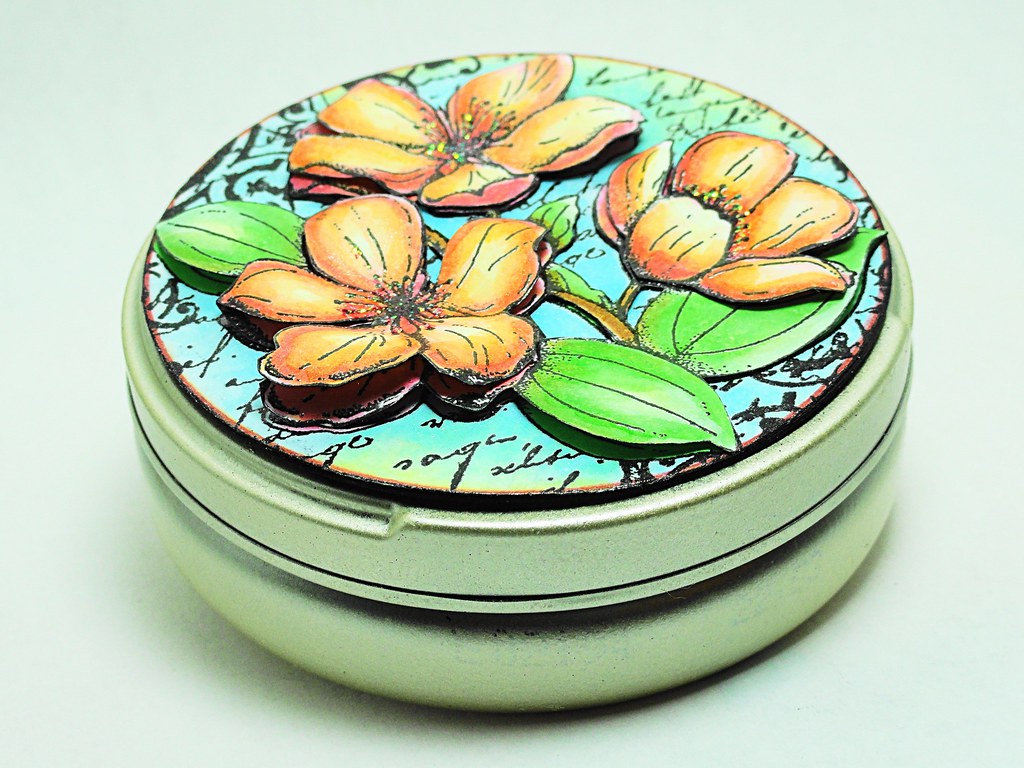
Today's project is a notebook designed to be a small journal to capture memories.

Road Trip


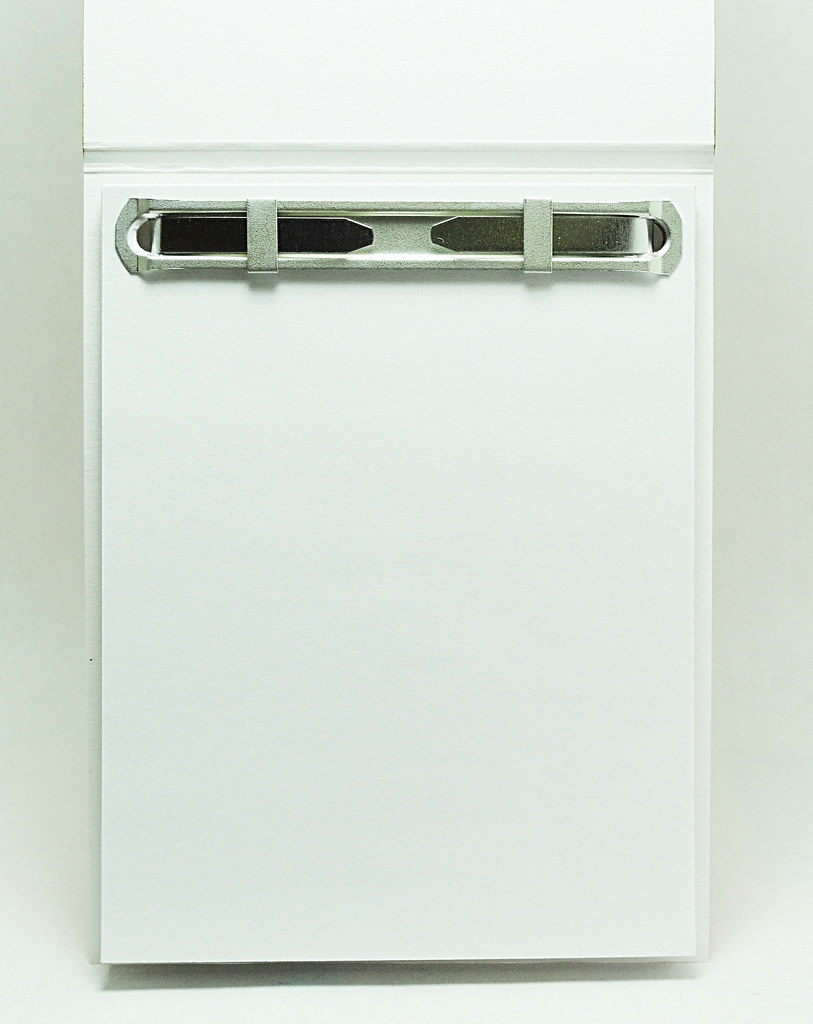
Inside there are lots of pages to affix photos/memorabilia or to write notes.  

DSC03124

If you are interested in assembling one of your own or would like to see how a certain segment was made, the detailed instructions along with a supply list have been provided below for your reference.


Instructions

Cut a 3 ½ x 8 7/8 inch piece of pink cardstock and score two vertical lines along the horizontal edge at 4 3/8 and 4 ½.  Fold on the creases to create a 3 ½ x 4 3/8 card with a 1/8-inch top fold.

Stamp San Francisco on the top half with Toffee Crunch Memento.  Using jumbo sponge daubers, highlight the edges with Peanut Brittle and Vintage Sepia VersaFine inks.

Cut a 2 ¼ x 3 ½ inch piece of orange cardstock and stamp with New York in Toffee Crunch Memento.  Using sponge daubers, highlight the edges with Peanut Brittle and Vintage Sepia VersaFine inks.  Attach to bottom half of the prepared base with dimensional foam.

Add small dots around the perimeter of the design with a Tuxedo Black Memento marker.

Letters:
Stamp the letters (Robust Lowercase) on white cardstock with Toffee VersaFine.  Add subtle highlights with a sponge dauber and Love Letter Memento. 

Stamp San Francisco and New York over the letters in Tuxedo Black Memento.  Trim the letters and pounce with Vintage Sepia VersaFine.  Sprinkle each letter with embossing powder, tap off excess and heat set.

Adhere the letters to the front of the notepad with dimensional foam.

Car Embellishment:

Stamp the car (Hello Gorgeous) with Onyx Black VersaFine on white cardstock and heat emboss with clear powder.  Trim the image and color the windshield, driver and wheels with Memento markers.  Set aside.

Apply Turquoise Gem VersaMagic to white cardstock with a jumbo sponge dauber.  Stamp the car over the ink with Onyx Black VersaFine and heat emboss with clear powder.  Trim the body of the car eliminating the windshield, driver and wheels.

With dimensional foam, elevate the trimmed inked design over the full image.  Attach the dimensional element to the front of the notepad with additional dimensional foam.


Notepad:

For a sturdy base for the notepaper, cut a 3 ¼ x 4 ¼ inch piece of cardboard and using the fastener as a template, lightly trace the holes with a pencil.  Create the holes with a hole punch. 

Cut 24 pieces of copy paper to measure 3 ¼ x 4 ¼.  Using the cardboard base created in the previous step as a template, mark the hole placement with a pencil on the copy paper rectangles and punch the holes.

Thread the cardboard base onto the prong fastener, then the notepaper and finish with the top portion of the fastener.  Secure the fastener arms.

Apply heavy-duty, double-sided adhesive tape to the back of the notepad and adhere inside the cover.


Thank you for "zooming" by today in your cyber car and sharing a bit of your day with me!

Elizabeth

Supplies:
Penny Black Mix & Match Cardstock: Rose Garden 14-001, Summer Sun 17-002
ImagineCrafts/Tsukineko:  Toffee VersaFine (VF-052), Vintage Sepia VersaFine (VF-054), Onyx Black VersaFine (VF-082), Turquoise Gem VersaMagic (VG-015), Love Letter Memento (ME-302), Peanut Brittle Memento (ME-802), Toffee Crunch (ME-805), Tuxedo Black Memento (ME-900), Memento Markers: Cantaloupe (PM-103), Angel Pink (PM-404), Lilac Posies (PM-501), Summer Sky (PM-604), Desert Sand (PM-804), Tuxedo Black (PM-900), London Fog (PM-901), Sponge Daubers (ST-DAB-003), Jumbo Sponge Daubers (ST-PKG-002)
Clear Embossing Powder (EB-000-005)
Other: Dimensional Foam Tape, Heavy-duty, Double-sided Adhesive Tape, Cardboard, Copy Paper, Hole Punch, Prong Fasteners

For questions and/or comments, please feel free to e-mail me at:  elizabeth.a.allan@gmail.com


February 25, 2013

Transforming Backgrounds into Gifts

Large background stamps make great gifts!

Happy Birthday

Taking a small portion of a larger background can instantly create a decorative miniature.


DSC03945


DSC03944


Clean and simple in 5 quick steps: 
  1. Trim a white Les Petites card to measure 3 ¼ x 3 3/8 and dry emboss a border ¼” from the sides around the perimeter.  Set aside.
  2. Cut a 1 ¼ x 2 ¼-inch piece of white cardstock and edge with Delicata Golden Glitz ink.  Stamp "happy birthday" in Onyx Black VersaFine and heat emboss with clear powder.
  3. Cut a 1 3/8 x 1 5/8-inch piece of white cardstock and stamp Allover Pattern across the front in Teal Zeal Memento ink.  Softly distress the sides with the same color ink and then paint with a light layer of Interference Blue Watercolor.
  4. Tie a sheer ribbon around the gift and add a tag stamped with "wishes" in Teal Zeal Memento.  Add a tiny gem to accent.
  5. Attach the gift with dimensional foam tape to the sentiment panel then attach the entire piece to the front of the prepared card with dimensional foam tape.


DSC03946

Smiles,
Elizabeth

Supplies:
Penny Black Stamps: Allover Pattern 40-109, Wishes 30-103, Sentiments 30-025
Penny Black Mix & Match Cardstock: Storm 01-001
Penny Black Les Petites: Berrylicious 90-004
Imagine Crafts/Tsukineko: Onyx Black VersaFine, Teal Zeal Memento, Delicata Golden Glitz, Jumbo Sponge Dauber, Clear Embossing Powder
Offray: Sheer Ribbon
USArtQuest: Jewelz Duo & Interfence Watercolor Palette (Interference Blue)
Other: Scoring Tool, Crystal Gem

February 21, 2013

Sweet Wishes (Positively Negative)

I don’t mean to be negative today, but it is just too much fun!


Sweet Wishes

A small circle cut into the elevated panel creates a positively perfect negative space to stamp this sentiment from Penny Black's Friendship collection.


Side View


The colorful panel started with a piece of white cardstock that was distressed with Dandelion, Cantaloupe and Morocco Memento inks.  Penny Black's Dots in Space was then inked starting at the top with Dandelion Memento ink and then gradually transitioned into Cantaloupe Memento ink.  Tip/Hint:  This inking process provides a soft transition of color in the final stamped image.

Penny Black's Scintilla was stamped on a separate piece of white cardstock in Onyx Black VersaFine and heat embossed with clear powder.  After coloring with Copics, the piece was trimmed and attached to the card with dimensional foam tape.

Enjoy putting some "negative" creativity into your designs,

Elizabeth

Supplies:
Penny Black Mix & Match Cardstock: Storm 01-001
3M Scotch: Dimensional Foam Tape
Copic Markers
Imagine Crafts/Tsukineko: Black Onyx VersaFine, Dandelion Memento, Cantaloupe Memento, Morocco Memento, Clear Embossing Powder, Jumbo Sponge Dauber
Ranger: Yellow Stickles
Spellbinders: Standard Circle Nestabilities


February 18, 2013

Tin-spiration (From Trash to Treasure)

I laugh as I look at my recyclables.  They are sorted according to plastic, metal, glass, cardboard/paper and future craft supplies!

Altered Tin

I saved this empty candy tin as it was a lovely shape and size to make this treasure tin.


This project was created with just one stamp!
Flower Poetry by Penny Black.


Here is a picture tutorial that shows the metamorphosis from trash to treasure…..


 DSC04354
Platinum StazOn was applied to the tin to give it a silver burnished effect while also covering any manufacturing wording.  Several coats were needed with ample drying time between each application.


DSC04355
Flower Poetry was stamped on white cardstock with Onyx Black VersaFine and heat embossed with clear powder.  A circle was die cut from the image to fit the top of the tin.  A second circle of the same size was die cut from cardboard (cereal box) to serve as a reinforcing stability base for the image.

After coloring the image (Copic Markers), Shimmer Creative Medium was spread across the surface to give a subtle, sparkly shine.  Tip/Hint:  Detailed shading is not needed on the flowers/leaves in this step as they will be subsequently covered with additional images.

The colored image was then adhered to the cardboard then attached to the top of the prepared tin with Tombow Power Adhesive Tabs.


 DSC04357
Flower Poetry was stamped two more times on a separate piece of white cardstock in Onyx Black VersaFine and heat embossed with clear powder.  Each set was colored (Copic Markers) and trimmed.  Detailed shading is needed on the leaves from the set on the left and the individual flowers on the right as they will be the elements exposed in the final layering.  A top coat of Peachy Keen watercoloring was added to the individual flowers for a sparkling glow.


DSC04361
A light coating of GooseBumps was added to the back of the flowers to add stability.


DSC04358
The largest grouping of flowers was aligned and adhered to the top of the prepared tin.  Tip/Hint:  Glue was used in strategic areas so portions of the flowers and leaves could be bent to add dimension.


DSC04363
Next, the individual flowers were adhered.  Tip/Hint:  Using a combination of alignment and slight off-setting while adhering the flower elements will add to the visual depth of the design.


DSC04365
The centers of the flowers were accented with Fruit Punch Stickles.


DSC04366

As always, if you have any questions and/or comments, please feel free to contact me at:  elizabeth.a.allan@gmail.com

Thank you for stopping by to visit,
Elizabeth


Supplies:
Penny Black Stamps:  Flower Poetry 4311K
Copic Markers
Imagine Crafts/Tsukineko: Onyx Black VersaFine, Platinum StazOn Metallic, GooseBumps Clear Texture Spray, Shimmer Creative Medium, Clear Embossing Powder
Tombow: Power Adhesive Tabs
Ranger: Fruit Punch Stickles
Spellbinders: Classic Circles
USArtQuest: Peachy Keen – Sparkling Pastelles Watercolor Palette

February 15, 2013

Take Flight 20 - Day 12


Take Flight Twenty Penny Black

Penny Black's Take Flight Twenty is in full swing and I am excited to share my second project on Day 12.

Hooray for Graduation Sneak Peek

This envelope project has lots of Hoo, Hoo, Hooraying to share with graduates!  To see the full reveal with a step-by-step photographic tutorial click "here".

Don't forget that besides twenty days of creative inspiration from all the designers, one lucky person has the chance to win 20 of Penny Black's new stamps!!

Hooray for Fridays!!
Elizabeth

February 13, 2013

Bring On The Cake!

A happy dash of sweet wishes ....

 Bring in the Cake

...with Penny Black stamps!


Make This Card in 6 Steps
  1. Create a card base from Clear Skies cardstock and stamp Roman Surround across the front in Aegean Blue VersaMagic.  Set aside.
  2. Stamp the party flags from Let’s Go Wild in Aegean Blue VersaMagic across the top part of a white piece of cardstock.
  3. Mat the white cardstock from the previous step with a slightly larger piece of Grand Canyon cardstock. 
  4. Die cut a small Reverse Wonky Rectangle from white cardstock and fold in half.  Stamp the sentiment from Tweet Tweet in Onyx Black VersaFine toward the bottom of the die cut.  Insert three colored brads just below the fold then wrap around the top of matted cardstocks.  Place adhesive on the back side of the tag and dimensional foam under the front.
  5. Attach the entire piece from Step 4 to the front of the prepared card with dimensional foam.
  6. Stamp Prize Cupcake on a separate piece of white cardstock in Onyx Black VersaFine and heat emboss with clear powder.  Color, trim and attach to the front of the card with dimensional foam.  Design Variation: As an alternative to fussy cutting the image, Prize Cupcake can also be stamped on the main white cardstock panel as part of Step #2.
Enjoy!
Elizabeth

Supplies:
Penny Black Mix & Match Cardstock: Storm 01-001, Blue Skies 10-002, Grand Canyon 03-001
3M Scotch: Dimensional Foam
Copic Markers
Image Crafts/Tsukineko: Onyx Black VersaFine, Aegean Blue VersaMagic, Clear Embossing Powder
Spellbinders: Reverse Wonky Rectangles
Other: Colored Brads